I had all the parts for my Baja Bug project lined up in the basement long before I was ready to use them. First, there was a lot of work to be done on the outside and inside of the body. The middle part of the body had a few dents and dings in it that would have to be repaired and the floor pan, which had rusted through in a couple of places, would also need some work before I was ready to install most of the parts I had received. I have to admit that I was more than a little overwhelmed by the magnitude of the project I had taken on and, for a moment, just didn't know where to start. I'd never done much body work, but I had seen enough of it done on television and in my repair manuals to have a rough idea of how to go about it. Sanding off the old paint was something I knew how to do, so I started there while I figured out where to start on the rest of the project.
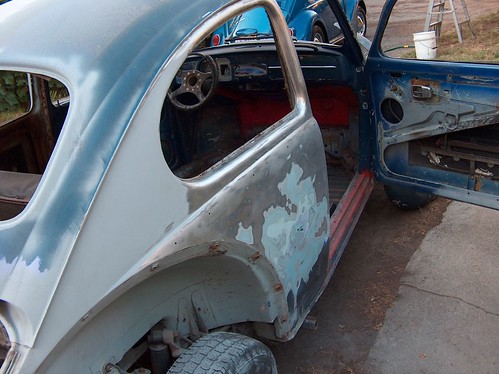
The original color of the car was a VW blue-gray color, but over the years the car had been painted several times. Each new coat of paint had been laid down right over whatever color had been there previously, so on most of the body there was layer after layer of a variety of paint colors and types. In some places the paint was chipped and scratched, in others it was peeling. In the spots where the fenders had been bolted on and in the wheel wells, the car was a different color. As with everything about this car, this was turning out to be a bigger job that I had anticipated. As I sanded away a layer of paint, another layer would appear. I learned that the car had been painted pink at one time, and sky blue before that. It was no wonder that the paint was chipping, as it was quite thick and brittle, so any impact that caused the body to flex would crack the paint. I didn't want to gouge the sheet metal under the paint so I was using rather fine-grained sand paper and while that kept the sheet metal unharmed, it slowed down an already painfully slow and very dusty process. In addition, since I had to do this whole project outdoors, I needed to spray primer onto the bare metal I had exposed as I finished each section to keep the body from rusting. It seemed as if just the body work was going to take forever. This was certainly turning out to be a much bigger project than the Dune Buggy build. I had had to do quite a lot of sanding on the buggy's floor pan, both top and bottom, but having a whole body plus a floor pan to deal with greatly expanded the scope of the project for this car. I persevered, though, and every day I would go out and sand and prime another little section. I learned about hammering out dents and I acquired some of the basic body working tools to help me with that process. I straightened out the dents and dings as best I could.
On the inside of the car, the floor pan behind the seats had rusted through in spots. In one area it was so severe that I needed to replace that section of the floor pan. My parts guys at B.C.E. had just what I needed for that, a leftover piece of replacement pan material from a project they had done. It wasn't a perfect fit since it had been made to fit a different year car than mine, but, with a little trimming of both the new piece and the damaged area, I was able to make it work. The optimum way to do this sort of repair is to weld the new sheet metal into place and then grind the welds smooth so that you have a seamless looking final product. That's not how I did it. My welding skills, at that time, were not really up to that sort of delicate work, and my budget didn't allow for paying someone else to do the work. Instead I laid down some silicone caulking between the two sheet metal pieces and then riveted the replacement piece into place. With a little black paint, the end result was serviceable, even if it wasn't beautiful.
For awhile I would work on the car nearly every day, but sanding off all of that old paint in small sections in the evenings when I had time to work seemed like it would take forever. At one point, I lost my momentum on the project and the ugly unpainted, half-finished, fender-less hulk just sat there behind the garage while I ignored it and worked on other things. It was just too much to deal with.
Finally, the fiberglass parts arrived. What I unpacked the giant box that they were shipped in and laid them out near the car, I realized that I was in way, way over my head on this project. Here I had this huge one-piece front end that was supposed to attach to a hinged front bumper, two large fenders that were supposed to bolt to the back of the body somehow, and this big whale-tail spoiler that was supposed to attach who-knows-where or how. There were no instructions. I didn't know anyone who had ever built one of these things, so I had no one to ask. I was going to have to figure this out for myself.
I downloaded pictures of Baja Bugs from the internet. I read articles about how other people has gone about building their own cars. I would take the pictures out to the back yard and look at what I had and what they had and try to figure out how to get what I had to look like what I had envisioned. One of the major problems that held me back was that to get the end product I was looking for, I would have to cut off parts of the front and rear of the existing car. If you are going to cut parts off of your car, it's better to know exactly where to cut, because welding the parts back onto the car, if you make a mistake, is not at all my idea of a good time. I spent hours holding the fiberglass parts in place on the car and trying to figure out where to cut the body and how to attach the parts once the cuts were made. The one-piece front end didn't seem to fit right and it took a long time to figure out just where to drill the holes at the front so that it could be mounted to the hinged bumper.
I did figure out how to weld on the front bumper, but I ended up cutting off too much of the front end and had to weld a section back on so that there was a way to mount the fuel tank. Once I had the bumper mounted, I spent hours with that front end using all the bungee cords I owned to get it positioned just right before I felt confident enough to mark the places where the front mounting holes needed to be drilled. With a little innovation and a short piece of 2X4 lumber I got the front end lined up, the holes marked and drilled and the huge thing bolted to the bumper. Now I had to figure out how to install the hood hold-downs so that it would stay in place when closed. All the recommended hood hardware was just too short to work for this front end, but I found what I needed at the local auto parts store. Again, the solution wasn't pretty, but it would work and, at this point, that was all that mattered. The headlight mounting kits I had bought weren't going to work with this front end, so I had to find some other way to mount the headlights. Once I had the right headlight hardware, I need to figure out exactly what size holes to make in the fiberglass so that they could be installed. I carefully made templates out of cardboard so that the holes I had to cut would be exactly the right size. If I screwed up at this stage, I'd ruin the whole front end. Luckily, I got it right and the headlights fit perfectly. Next I needed to figure out how to mount the rear fenders and where to cut the back of the car. And I still needed to finish the sanding and priming on the middle part of the car. There was a long, long way to go.


No comments:
Post a Comment