Wednesday, August 18, 2010

A Work in Progress, Chapter 5

Axle Parts

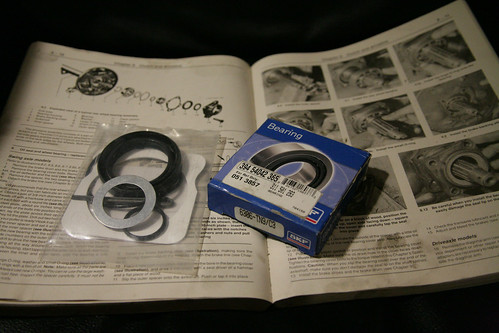
For the Volkswagen swing-arm rear axle, there are eighteen parts that must be assembled, in the correct sequence and in the correct location, to seal up the end of either the right or left side axle. Most of the parts are available for purchase in a Rear Axle Seal Kit. The eighteen parts needed are two spacers, an axle bearing, a washer, two "O" rings, a gasket, a seal, a bearing cover, the brake backing plate, four bolts and four lock-washers. If you have all the correct parts for the transaxle you are working on, it is a relatively easy project to do. If you are missing one of the parts, or one of the parts in not correct for that axle, or if you don't have a shop manual that shows the correct location and sequence for each of the parts, it is impossible to get the axle to seal. I now know, I believe, all the ways to do this project wrong.

The first thing I was missing was a proper shop manual, so I didn't know the exact order in which the parts needed to be installed, nor did I know the correct location for all of the parts. I thought I knew. I'd managed to get the rear axles of the Dune Buggy sealed up, so I thought I knew what I was doing. I didn't. I had most of it right, but, from the beginning, I was missing one key piece of information that resulted in my failure to get it right for the next six years. That's right, I've been driving this car with leaking rear axle seals for six years. Over that time, I've tried at least a dozen times to get it right and, until now, have always gotten it wrong. The problem has always been that I was certain that I knew the sequence and location for all the parts.

When you are sure you know something, you can't learn anything new about that subject. That is such an important concept that it ought to be made into a large banner and posted above every desk, every workbench, every mechanic's tool box, every kitchen, every bedroom, every library, every schoolroom, everywhere. If you think you know everything about the subject, you stop looking at that subject. You assume (always a dangerous thing to do), since you know what is going on with this area about which you know everything, that the problem has to be coming from something, or somewhere, else. I knew that I had the axle put together correctly, so the leak had to be caused by something else.

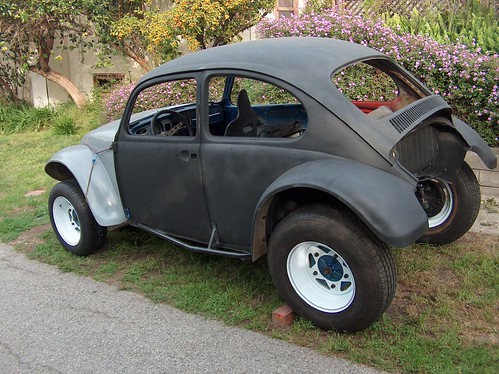
The problem was compounded by the fact that I was attaching Type III style brakes to the axle. This meant that the backing plate was different from what was originally installed on the car. That fact added just enough of a variable to blind me to the fact that I didn't actually know everything about putting together a rear axle.

What I know now is that when I first put the car together, I used all the right parts, but had installed one of the "O" rings in the wrong location. The way I did it made logical sense to me at the time, but in truth, was not logical at all. I was certain that I was doing it right, though, so when I discovered that I had a leak, I looked to other areas for the cause. I decided that if must be the bearing cover that was the problem, since that seemed to be where the leak was originating, so I got some different bearing covers and installed them. Big mistake. Major mistake. I thought that, since they looked pretty much the same with the exception of a drain hole at the bottom, the bearing covers where interchangeable. I was wrong about that.

If there is one lesson that I have had to learn over and over and over again throughout my life, it is that if you don't have a fundamental understanding of what you are doing, you are eventually going to run into trouble somehow. If you don't know how and why a system works, you'll never be able to solve the problems that occur when that system stops working. If you only know that this part goes there, but not what that part does in relation to the other parts to which it is attached, you'll be helpless when something goes wrong. You'll wind up doing what most people do when they have a problem, you'll attribute the source of the problem to the wrong cause. Once you've done that, you are on the road to frustration and despair. In the case of auto mechanics, you will replace part after part after part and never solve the problem, since you are attempting to fix something other than the actual thing that is broken. If you are like me, you can go down this road for six years before you finally discover that you don't know everything there is to know about a given subject.

The secret to problem solving is observation. It's not just a simple matter of looking at a thing. You have to look at that thing and actually see what is there. You can't look at it and decide that, because it looks like something similar, it is identical in form and function to that other thing. You have to look at the thing in relation to its surroundings. How does it fit? Where does it fit? If other parts need to fit on it or into it, will they? Look at the thing, not just for its similarities to other things with which you are familiar, but also for its differences from those other things. This sort of observation is a skill that if not constantly and consciously practiced and exercised will soon atrophy. You must work at your observation skills. They are the key element in your war against assumption. Don't assume. Observe. If you hone and polish your observation skills, you will find that they will serve you very well in all areas of your life.

After six years of 90 weight axle lubricant dripping all over my wheels and brake shoes, after a dozen or more attempts to fix the leak, after cleaning and replacing several sets of oil-soaked brake shoes, after giving up and resigning myself to never having rear brakes, I finally got fed up with the problem and decided to solve it once and for all. I finally got a proper shop manual and read it. Even then, I still got it wrong, so I read it again. Then I looked. I looked at the photos in the manual, and I looked at the parts on the car. I discovered two things. The first and most obvious was that I had been installing one of the "O" rings in the wrong place. The second was that the bearing cover that I had installed years ago as a attempt to solve the problem was the wrong part. The cover I had substituted for the original part was not holding the bearing in place, but was instead allowing the axle to move in and out about a eighth of an inch. It's no wonder that there were problems, I had made foolish mistakes due to my failure to observe.

What I did wrong was; first, to assume that I knew everything about assembling a Volkswagen rear axle; second, not to understand the fundamentals of the parts I was working with; and, third, not to look at what was there and see which parts were causing the problem. By assuming I knew what I was doing, I didn't allow myself observe or understand the problem. Once I finally looked at the problem and saw what was actually there, I was able to determine the cause, correct the mistake and fix the problem.

It is one thing to have a piece of data. It is quite another thing to actually apply that data to the real world. In my mind, this is the difference between the artist and everyone else. The artist knows the fundamentals of the medium in which he is working, be it painting, performing, sculpting, acting, programming computers, or fixing cars. The artist can see what is there in front of him/her, knows the fundamentals of how and why the thing works and can thus innovate, create and solve problems with an ease that seems like magic. When something goes wrong, the artist can look at the problem, know how things should be working, see where something went wrong, diagnose and solve the problem and achieve a smoothly functioning product. You can apply this viewpoint to every aspect of your life. I try to do this. I don't always succeed, but that doesn't keep me from continuing to work at it. Try it. Try living life as a artist. If nothing else, it's a lot of fun.

Friday, August 13, 2010

A Work in Progress, Chapter 4

Brakes

With the transaxle installed it was time to install the brake system. At the suggestion of my friends at B.C.E., I decided to put Type III brakes on the rear of the car, rather than the '67 style that came with the car. All the moving parts that had come with the car when I bought it were worn out anyway, so there was no reason not to start from scratch. The advantage of the Type III-style brakes is that the brake drums are substantially wider than the stock '67 drums, thus providing more surface area for the brake shoes to contact. More surface area means more friction which translates into more stopping ability. The disadvantage of changing to the Type III set-up was finding the parts. After some searching around, though, we got everything I would need to do the installation: backing plates, wheel cylinders, springs, shoes, drums and the emergency brake hardware.

I didn't trust anything that had come with the car, so I was replacing the whole system, including all the steel lines, the rubber lines, master cylinder, all four wheel cylinders and all the drums. It may not sound like much, but that's a lot of pieces: seven steel lines that have to be bent into the right shapes, four rubber lines, four wheel cylinders, four brake drums, four sets of brake shoes, four sets of hardware which includes springs and pins and retainers and adjusters, a brake fluid reservoir and a couple of pints of brake fluid. In addition, there are wheel bearings and seals and grease to deal with as well.

Getting the new brake lines installed was not too difficult. You just have to be careful not to bend the steel lines too sharply or you'll kink them, making them useless. The sequence is to bolt the new master cylinder in place and go from there. There is one long steel line that runs from the front to the back of the car where it attaches to a splitter that lets you hook up the right and left sides with shorter steel lines which attach to flexible rubber lines which, in turn, attach to another set of short steel lines. At the front there are two steel lines that attach to rubber lines on each side of the car. The objective is to end up with nice, clean, unobstructed lines that let you push the high pressure brake fluid from the master cylinder to the wheel cylinders. Pushing the brake pedal causes the master cylinder to pump the brake fluid to each of the four wheel cylinders which push on the brake shoes. The brake shoes rub on the inside of the brake drums and the resultant friction is what slows and stops the car. When all of the parts are adjusted correctly and working properly, you have a vehicle that slows and stops in a predictable manner. When you completely redo you own braking system, you gain an understanding of how the system works, and after that, it is very easy to figure out what is wrong when you encounter braking problems.

At the end of each of the four brake lines is a wheel cylinder, one for each wheel. These are mounted to a backing plate to which are also attached the brakes shoes and adjusters. The brake shoes are attached with pins and springs and fit into slots at the ends of the wheel cylinders and adjusters. The parts for the front of the car are different than the parts for the rear of the car, especially when you are mixing and matching years and models as I was. Mounting the front brake shoes and drums is rather straightforward. I installed new wheel bearing and seals in the new drums and had the front together in short order. Mounting the rear brake shoes is very similar, except you need to attach the actuating lever for the emergency brake to the rear brake shoe on each side and attach the emergency brake cable to the lever. That part is easy. Sealing up the rear axle turned into a series of errors and disasters which have continued until only a few days ago. It was another lesson that I wound up learning the hard way.

Tuesday, August 10, 2010

A Work In Progress, Chapter 3

Wide Tires and Wheels

Figuring out how to mount the wide, rear fenders turned out to be a bit easier than getting the front end lined up and latched down. When I looked at the fenders more closely, there appeared to be faint markings in the fiberglass that more or less corresponded to the mounting holes where the original VW fenders had been attached. I held each of the fenders to the body and carefully marked them at the spots where the holes needed to be drilled. Once I had the holes drilled, I attached the fenders temporarily to the body and started figuring out where I would cut off the back of the car. This was another situation where I didn't want to cut off too much, and since this area would be exposed, it would ruin the look of the car if I did it wrong. I knew where the top of the cut had to start, that much was obvious from where the fenders ended. I just had to decide where the cut on each side would end. I thought about it for awhile and then made the decision. I marked one side, made some measurements and then marked the other side. I got out my trusty Saws-All and made the cuts. It looked pretty good. I had the right shape for the body, now it was time to finish up the sanding and put the rest of the parts in place.

There was one piece of fiberglass that I had purchased that ended up being that last part I would attach to the car. I had bought this whale-tail spoiler that I thought would look great and would also protect the engine from the elements to some degree or another. I knew it had to be mounted on the back of the car, but no matter how many times I brought it out of the basement and set it against the body, it wouldn't line up in any logical place where that it could be mounted. It just didn't make sense and each time I would just put it away again in the basement where it would haunt me until after everything else was done.

As the engine parts had arrived, I assembled them on a table in the basement. I had decided to go with a 1776 cc engine for this car. When I built the Dune Buggy, the first engine I tried in that car was a 1500 cc motor with all stock Type I style parts attached. It was a low horse-power set-up and, like all Type I engines, it had an upright cooling shroud with a fan inside that turned via the generator which was driven by a belt from a pulley on the end of the crankshaft. It's a very simple and traditional set-up and worked great until I decided I needed more horsepower, plus I wanted to try a Type III motor in the Buggy to give the rear end a flatter profile. The Type III motor has the cooling fan and shroud at the rear of the motor which makes the engine very flat, which is why it's called a "pancake" engine. That engine came out of my 1966 VW Squareback when I sold it, sans engine, to a guy in Highland Park, California. The Type III motor has 1600 cc's and dual carburetors. I liked the dual carburetors and the added horsepower, but it wasn't enough. I found a 2000 cc engine from a VW bus and figured out a way to match it up to my existing transaxle and ran that for awhile. That was fun, but it was too big, too heavy and too long for that car. That's when I opted for the 1776 cc engine for the Dune Buggy. That engine has been perfect for that car, plenty of horsepower, good fuel economy, and very reliable. Since the 1776 cc engine worked so well in the Buggy, I chose it for my Baja Bug project as well.

I went with the Type I configuration for the Baja Bug for the simple reason that a Baja Bug is a Type I car. I bought a 1776 cc long-block through my friends at B.C.E. in Eagle Rock, California, along with all the other parts I would need to assemble a complete engine: dual carburetors, chrome shroud, alternator (an upgrade from the generator I was running on the Buggy), chrome cooling tin around the cylinders, a .009 Bosch distributor, a mechanical fuel pump, spark plug wires, oil pressure sending unit, spark plugs, nuts, bolts and screws. It looked very nice sitting there on the table in the basement. Before I could install the engine in the car, though, I needed to replace the transaxle.

Given the condition of the car when I bought it, though it had a transaxle attached, I decided to replace whatever it came with and put in a used long-axle '68-style unit instead. I chose a used transaxle to try to economize for this project. That proved to be a mistake. Again, this was the same style transaxle that I had used in the Dune Buggy and I not only liked the extra width at the rear of the car, but I like the gearing as well. It was a great stock transaxle that worked well both on and off the highway and seemed the right choice for the Baja Bug as well. Replacing a transaxle isn't an especially difficult task mechanically, but physically it can be a bit demanding. If you're doing the job in your backyard, it involves a lot of laying around on your back rolling a big heavy mass of gears around on top of a floor jack to get everything lined up and bolted in. It's especially tricky when the transaxle tries to slip off of the jack while you're under it. I replaced all the mounting hardware at the same time, since the original 1967 parts were a bit worn out. This was my first transaxle replacement, so I learned a few new techniques as I went along. It's a good thing I did, because this installation turned out to be a practice exercise. You see, after I got the whole car put together, that used transaxle proved to be worn out and would pop out of gear on both acceleration and deceleration, so I had to repeat the whole procedure. Of course, I didn't know it was worn out at the time, so I just continued with the assembly process. There was still quite a lot to do to get the car on the road.

Wednesday, August 4, 2010

A Work in Progress, Chapter 2

Sanding Off Nearly 40 Years of Bad Paint

I had all the parts for my Baja Bug project lined up in the basement long before I was ready to use them. First, there was a lot of work to be done on the outside and inside of the body. The middle part of the body had a few dents and dings in it that would have to be repaired and the floor pan, which had rusted through in a couple of places, would also need some work before I was ready to install most of the parts I had received. I have to admit that I was more than a little overwhelmed by the magnitude of the project I had taken on and, for a moment, just didn't know where to start. I'd never done much body work, but I had seen enough of it done on television and in my repair manuals to have a rough idea of how to go about it. Sanding off the old paint was something I knew how to do, so I started there while I figured out where to start on the rest of the project.

The original color of the car was a VW blue-gray color, but over the years the car had been painted several times. Each new coat of paint had been laid down right over whatever color had been there previously, so on most of the body there was layer after layer of a variety of paint colors and types. In some places the paint was chipped and scratched, in others it was peeling. In the spots where the fenders had been bolted on and in the wheel wells, the car was a different color. As with everything about this car, this was turning out to be a bigger job that I had anticipated. As I sanded away a layer of paint, another layer would appear. I learned that the car had been painted pink at one time, and sky blue before that. It was no wonder that the paint was chipping, as it was quite thick and brittle, so any impact that caused the body to flex would crack the paint. I didn't want to gouge the sheet metal under the paint so I was using rather fine-grained sand paper and while that kept the sheet metal unharmed, it slowed down an already painfully slow and very dusty process. In addition, since I had to do this whole project outdoors, I needed to spray primer onto the bare metal I had exposed as I finished each section to keep the body from rusting. It seemed as if just the body work was going to take forever. This was certainly turning out to be a much bigger project than the Dune Buggy build. I had had to do quite a lot of sanding on the buggy's floor pan, both top and bottom, but having a whole body plus a floor pan to deal with greatly expanded the scope of the project for this car. I persevered, though, and every day I would go out and sand and prime another little section. I learned about hammering out dents and I acquired some of the basic body working tools to help me with that process. I straightened out the dents and dings as best I could.

On the inside of the car, the floor pan behind the seats had rusted through in spots. In one area it was so severe that I needed to replace that section of the floor pan. My parts guys at B.C.E. had just what I needed for that, a leftover piece of replacement pan material from a project they had done. It wasn't a perfect fit since it had been made to fit a different year car than mine, but, with a little trimming of both the new piece and the damaged area, I was able to make it work. The optimum way to do this sort of repair is to weld the new sheet metal into place and then grind the welds smooth so that you have a seamless looking final product. That's not how I did it. My welding skills, at that time, were not really up to that sort of delicate work, and my budget didn't allow for paying someone else to do the work. Instead I laid down some silicone caulking between the two sheet metal pieces and then riveted the replacement piece into place. With a little black paint, the end result was serviceable, even if it wasn't beautiful.

For awhile I would work on the car nearly every day, but sanding off all of that old paint in small sections in the evenings when I had time to work seemed like it would take forever. At one point, I lost my momentum on the project and the ugly unpainted, half-finished, fender-less hulk just sat there behind the garage while I ignored it and worked on other things. It was just too much to deal with.

Finally, the fiberglass parts arrived. What I unpacked the giant box that they were shipped in and laid them out near the car, I realized that I was in way, way over my head on this project. Here I had this huge one-piece front end that was supposed to attach to a hinged front bumper, two large fenders that were supposed to bolt to the back of the body somehow, and this big whale-tail spoiler that was supposed to attach who-knows-where or how. There were no instructions. I didn't know anyone who had ever built one of these things, so I had no one to ask. I was going to have to figure this out for myself.

I downloaded pictures of Baja Bugs from the internet. I read articles about how other people has gone about building their own cars. I would take the pictures out to the back yard and look at what I had and what they had and try to figure out how to get what I had to look like what I had envisioned. One of the major problems that held me back was that to get the end product I was looking for, I would have to cut off parts of the front and rear of the existing car. If you are going to cut parts off of your car, it's better to know exactly where to cut, because welding the parts back onto the car, if you make a mistake, is not at all my idea of a good time. I spent hours holding the fiberglass parts in place on the car and trying to figure out where to cut the body and how to attach the parts once the cuts were made. The one-piece front end didn't seem to fit right and it took a long time to figure out just where to drill the holes at the front so that it could be mounted to the hinged bumper.

I did figure out how to weld on the front bumper, but I ended up cutting off too much of the front end and had to weld a section back on so that there was a way to mount the fuel tank. Once I had the bumper mounted, I spent hours with that front end using all the bungee cords I owned to get it positioned just right before I felt confident enough to mark the places where the front mounting holes needed to be drilled. With a little innovation and a short piece of 2X4 lumber I got the front end lined up, the holes marked and drilled and the huge thing bolted to the bumper. Now I had to figure out how to install the hood hold-downs so that it would stay in place when closed. All the recommended hood hardware was just too short to work for this front end, but I found what I needed at the local auto parts store. Again, the solution wasn't pretty, but it would work and, at this point, that was all that mattered. The headlight mounting kits I had bought weren't going to work with this front end, so I had to find some other way to mount the headlights. Once I had the right headlight hardware, I need to figure out exactly what size holes to make in the fiberglass so that they could be installed. I carefully made templates out of cardboard so that the holes I had to cut would be exactly the right size. If I screwed up at this stage, I'd ruin the whole front end. Luckily, I got it right and the headlights fit perfectly. Next I needed to figure out how to mount the rear fenders and where to cut the back of the car. And I still needed to finish the sanding and priming on the middle part of the car. There was a long, long way to go.