Wednesday, October 21, 2009

Dreams

Me and the Dune Buggy

What do you get when you take with an old Volkswagen chassis, shorten it, add a fiberglass body, a custom-built engine and transaxle, lights, wheels and tires? If you said, "A dune buggy, of course," you'd only be partly correct. The phrase, "The whole is greater than the sum of its parts," applies to dune buggies, as well as culinary creations, successful groups, or anything else imagined and built by human beings.

What you get at end of your dune buggy project is an idea brought to mechanical life in the real world. You've taken something from your imagination and made it real. You've made your own dream come true. You've made a decision and then acted upon that decision, time after time as each phase of the project was executed. You've altered the material universe and created something unique, something which has never existed before in its present form.

Sure, you had lots of help along the way, but the idea, the motivation, the creative spark is yours. You decided to go forward and create your own car. You made sure that any work done by others was done correctly and in accord with your concept of what the final product should be. You took control, you were in charge, you build your own car. In doing so, whether you realize it or not, you have learned a whole new way of thinking and you have gained a sense of self-worth that only a scant percentage of modern humans possess.

Don't stop here. Keep building, keep taking control, make things happen, continue to learn, teach someone else what you have learned, do things, imagine something else you want to create and then go ahead and create it. That's what dune buggies really are, they are the dreams that someone has made come true.

Thursday, October 8, 2009

Distributor vs. Carburetor: Choosing a Leader

1600cc

When you press the accelerator pedal on your dune buggy, you open up the butterfly valve inside the carburetor to allow more air into the engine. Usually, this creates more vacuum pressure inside the carburetor which draws more fuel into the engine and causes the engine to turn faster. If you have a centrifugal advance distributor, the ignition timing advances as the engine rpms increase. In some cases, this works just fine, but, in many cases, there is a noticeable "dead spot" in the acceleration response of the engine. This is caused by fact of the ignition timing lagging slightly behind the increased fuel/air mixture entering the engine when you press the accelerator. When that occurs, you also have a drop in vacuum pressure which causes the "stumble" you feel. If you pump the pedal a bit, it tends the minimize the lag, but it's still there, very annoying and potentially dangerous if you're trying to climb a hill or get through a busy intersection.

For some reason, centrifugal advance distributors became very popular some time ago and still remain so to the present day. I suspect it was largely a created demand generated by the marketing department at the manufacturer's headquarters. I can't think of any other reason why this type of distributor became so popular since it really doesn't work very well.

The idea situation would be one where, as the fuel/air mixture increased in volume, the ignition timing would advance right along with it, or even slightly ahead of it. I think of it as either leading with the carburetor or leading with the distributor. That's a simplification, of course, but that is essentially what happens. To put the distributor in the lead, you need to install one with a vacuum advance. There are lots of them available in the used market and there are new ones available in the after-market as well. With a vacuum advance mechanism on the distributor, the above sequence of events is altered. As you press the accelerator creating more vacuum pressure in the carburetor, the vacuum motor on the distributor advances the timing of the ignition simultaneously with the increased fuel/air mixture that is entering the engine. With these two elements working together, the acceleration lag disappears, acceleration increases and, not surprisingly, fuel economy improves.

You would think that this relationship would be intuitive with air-cooled VW engine mechanics, but that doesn't always appear to be the case. It took me a long time to figure out for myself, what should have been obvious from the beginning, but conventional wisdom said that centrifugal advance distributors were simpler and, thus, better and more reliable. It's not true. With the installation of a vacuum advance distributor on my 1776 cc motor along with the 2-barrel progressive Weber carburetor, the power curve is smooth, the acceleration is excellent and I'm getting better gas mileage. I also find that my high-altitude performance is better and that the engine doesn't load up and foul the plugs like it used to.

You probably have an old vacuum advance distributor laying around in your garage right now. Try it, I think you'll be pleased with the improved performance you will experience.

Tuesday, September 29, 2009

The Fuel Line Fiasco

Dune Buggy

One of the worst disasters that occurred during the build happened on the day I thought I was ready to put some gas in the tank and attempt to start the car. I had carefully hooked up the rubber hoses up to either end of the steel line that runs through the tunnel down the center of the vehicle. I had even put in an in-line fuel filter so that any residual crud that had built up in the steel line would be caught before it got to the engine.

I had siphoned a gallon of gas out of one of my other cars into a plastic gas can I had acquired. I attached the pour spout and upended the can into the tank. Suddenly there was gasoline everywhere -- inside the pan, on the floor, running down the driveway -- everywhere except in the fuel lines. The one thing I had forgotten to check was the steel fuel line hidden inside the tunnel. In the years since 1957 when it had been installed at the factory, or at the time it was shortened when the pan was cut, or both, it had become more of a sieve than a line. The gasoline was running out of the holes just as fast as I poured it in. The car was saturated with fuel. There was nothing to do at that point but leave it alone and let it dry out.

While I waited for the gasoline to evaporate, I thought about how to solve the problem. I needed a new fuel line. There's no easy way to replace the original line inside the tunnel. To do so would require cutting holes in the backbone of the frame and then re-welding the holes to restore its structural integrity. I could run a fuel line under the car, but that would expose it to whatever rocks I might drive over if I ever took it off-road. No, the easiest thing to do would be to drill one hole at the front of the pan and another at the rear and run the new line inside the car along the floor. I started rummaging through all the stuff I had in the basement to see if I could find anything that would work. There was a small roll of flexible copper tubing that I had acquired somewhere, probably something I got from my dad. I remember him hooking up a water line for a refrigerator ice maker some years ago. The copper must have been left over from that job. It was 1/8" copper tubing, pretty small inside, but a Volkswagen motor doesn't need much fuel volume to run. The copper line wasn't long enough for the whole run, but if I cut it in half and used copper to get the line though the body at the front and back and filled in the rest of the run with rubber fuel line, I could do it.

The next day after the gasoline flood had evaporated, I drilled the holes and installed the new fuel line. When I tried putting fuel in the gas tank this time, the gasoline stayed where it belonged. I ran the car that way for several years. Recently I bought a longer piece of copper tubing and replaced the pieced-together line inside the car with a contiguous piece of copper and replaced all the rubber fuel lines with new ones. It was just a precaution, though, as that cobbled-together fuel line I had made was still working just fine.

Thursday, August 20, 2009

When Turn Signals Turn on You

Turn Signal Instructions

I'm a great believer in reading, understanding, and following instructions. Usually, that works out just fine. There are rare occasions when it doesn't. This is the story of one of those rare occasions.

When I was planning the wiring of the dune buggy, I remembered that my brother had used an aftermarket turn signal switch on the Jeep we used to kick around in when we lived in Idaho Springs, Colorado. That switch was a big, shiny chrome box that attached to the steering column with an adjustable strap. It had a nifty little green light on it that would blink when it was flashing the turn signals. I thought that would be the perfect item for the dune buggy, but it had been quite awhile since our Jeep days. It was the early 70's when my brother had that Jeep and I wondered whether that switch was still being made nearly 30 years later. When I went to the auto parts store in Los Angeles in 1999 when I built my dune buggy, I found that same switch right there on the bottom shelf, nifty little green light and all. Of course, I bought it.

In the picture above, you can see the wiring diagram and instructions for installing this marvelous little device. It's really a shame that this wonderfully simply diagram is completely wrong. I carefully following the diagram and connected all the wires as indicated. When I switched on the power, nothing worked. Lights were not flashing. I check the diagram. I traced all the wires to make sure I had it right. It just wasn't working. As I said, the wiring diagram was wrong in every way. The colors of the wires just didn't correspond to the functions of the switch.

Anyone else probably would have taken it back to the store and demanded a replacement. For some reason, I don't do things that way. First of all, I knew that there wasn't another switch in the store. I had purchased the only one they had. Second, I wasn't going to let some simple little switch keep me from getting my turn signals working, so I took it apart, got out my continuity tester and started tracing circuits. Eventually, I figured out which circuit was the right side and which was the left. I reconnected all the wires to the correct circuits, powered up the vehicle and it actually worked. It's worked just fine throughout the entire the ten years since I fixed it. It really is a good switch, I guess whoever was working on the assembly line the day it was built was hung-over, drugged or asleep.

The moral of the story is that, as good an idea as carefully reading and following instructions is, sometimes it's just not enough. Sometimes you just have to dig in and figure things out for yourself. When you've done that, when you've taken things apart and figured out how they work, then you really get a fundamental understanding of what is happening when you turn the ignition switch, start the engine, and pull away from the curb. Fundamentals are especially important when something doesn't work, because if you know your fundamentals you can more easily isolate, diagnose and correct the problem. Without fundamentals you waste a lot of time fixing things that aren't broken.

Friday, August 7, 2009

Parts and People

Linda's Hands

These are the hands of a woman that I have know for nearly 25 years. She owns the Volkswagen parts store where I have been buying things since I first came to Los Angeles. She doesn't like having her picture taken, but she let me take this picture of her installing a seal on a windshield. She works very hard at keeping her little shop going and she is ably asssisted by Steve who works with her as mechanic and counterman. I was in her shop twice this week. I have to stop myself from driving over there and just hanging around. I love being in her shop. I feel at home there, and other than here in my actual home, there aren't that many places where I feel that way. I was thinking about how much I treasure her and her shop, how precious they are to me. Sometimes I stop by, just to say hello. Sometimes I go there to buy something, even though I don't really need it, just to make sure that she is still there.

I believe in supporting small, family-owned businesses. I like going to places where I know the people. I like it when they sometimes even remember seeing me before, even though it may have been weeks or months since I've been there. I enjoy talking to people who are good at what they do and who enjoy doing it. In a city the size of Los Angeles, there are still places I can go where the people like what they do, care about the people they meet, and have time to share a story and a laugh or two. It makes me happy to know that such people still exist.

As a general subject, I don't think I like "people" very much, but one-on-one and face-to-face I find that there are some that I love.

Tuesday, July 28, 2009

Wires, Wires and More Wires

Wiring Diagram

For me, the most difficult part of building the dune buggy was the wiring. Before I even started, I had to decide how much wiring I wanted to have in the car. This meant I had to decide what I wanted to include in the project in the way of accessories, gauges, sound equipment, lighting and whatever else might need electrical power. I also had to decide which wiring route I wanted to take. I could buy a complete VW sedan wiring harness for a little over $200, or I could buy a dune buggy wiring harness for about $65, or I could buy bulk wire from the hardware or auto parts store and design my own harness.

The first thing I did was to find an understandable wiring diagram of all the basic systems normally found in a Volkswagen. I found a vintage hardback Chilton's tune-up manual in a used book store that had a decent diagram which showed the basic circuits I would need to get the car running. I scanned the diagram into my computer, printed it out on two sheets of paper, taped them together, got out some colored highlighters and started outlining circuits. I decided that, since it was to be an open car, I would include only the essential electrical accessories, so as to keep weather damage and theft to a minimum. For a safe, running car I would need wiring for headlights, turn signals, tail lights, running lights, brake lights, instrument lights, engine warning lights and windshield wipers. To go with the lights, I would need a headlight switch, a dimmer switch, a turn signal switch, a brake light switch, a wiper motor switch, a gas gauge and sending unit, and an oil pressure switch. I would also need wiring for the engine electrical system. It looked to me like the dune buggy harness would just about cover all of those circuits, so I ordered the necessary harness and switches.

With the diagram and the parts list done, it seemed like the actually wiring would be fairly simple and straightforward. It really should have been, but it wasn't. When you are dealing with parts and wires that have never been put together in this particular fashion ever before, there are always going to be problems to solve. There were.

Tuesday, July 7, 2009

Parts and Systems

Ready For Another Trip to Big Bear Lake

Just as each project breaks down into smaller parts, the car itself breaks down into systems and major components. Here's what I consider the major parts and systems of an automobile.

Frame
Body
Suspension System
Engine and Drive Train
Engine Cooling System
Engine Electrical System
Body Electrical System
Braking System
Fuel System
Guidance System

You have to have all these things to have a safe, street-legal vehicle, whether it be car, truck, or motorcycle. In a dune buggy, you can get by with the bare minimum of most of these components. You may have noticed some things missing which you consider necessary on your own car, such as a heating and air conditioning system, or a sound system. You can add these to a dune buggy, but for a vehicle which is designed to go off road, as well as on the highway, it is best to keep things to a minimum. Extra weight and delicate electronics are not necessarily well suited to climbing hills or blasting through mud puddles in the rain. Some people feel that they can't do without such luxuries and add heaters, stereos, side-curtains with plastic windows, carpets and such to their buggies. I would be reluctant to expose that sort of car to mud puddles in the rain, or extremely dusty conditions, but some people do so and take whatever consequences that arise.

The above major parts and systems each break down into smaller sub-systems.

You would think that the frame is just the frame, but there are main frame members and braces and cross members on some frames. The Volkswagen frame started out at the factory as a welded one-piece floor pan, but over the years, parts of that floor pan are prone to rusting, so sometimes it is necessary to remove the floor parts and weld in new ones. On some VW-based dune buggies, including mine, these pans are shortened by a little over a foot, resulting in a smaller, lighter, more agile, but less roomy car.

The body of a car can include doors, windows, hood, trunk, top, and seats. In that case there is a break down into interior and exterior body parts. In my dune buggy, there is the body, a windshield and two seats. That's pretty much it. The body is in three pieces, the main body which includes the fenders and the rear deck, the front cowling, and the dashboard. There is also an optional roof which isn't ever necessary, though it makes the car much more comfortable by keeping the sun and the rain off your head. The windshield in my dune buggy is a separate assembly and bolts to the main body at the sides. There are no carpets, no heating systems, no air conditioning systems, no cupholders, no center consoles, no arm rests, no doors, no side or rear windows, and no box for your gloves.

What I like most about my dune buggy is how very simple it is. I tell people that it consists of the fewest parts you can put together and still have something you can call a car. The other systems outlined above break down into more complicated parts. I will write about those in future blogs. For today, it's enough to have looked at how you can break down a car into parts and systems to make it more easily understandable and less overwhelming. Every time I get out the tools and work on my cars, I learn something new. That's the most wonderful part of building your own cars, they teach you things about themselves and about life in general if you're willing to listen.

Sunday, July 5, 2009

One Step at a Time

Transaxle

The only way to keep from getting completely overwhelmed by this kind of project is to break it down into simple, individual tasks, such as: 1. Remove old transaxle, 2. Install new transaxle, 3. Install new rear brake backing plates, etc. Once, you've done this, you will be able to see the sequence in which these tasks must be done. You can't install the engine until you have swapped out the transaxles, and you can't install the new brake shoes until you've attached the backing plates and the new wheel cylinders. It's like that old song, "Them Bones," where you learn that the hip bone is connected the the thigh bone and the thigh bone is connected to the knee bone. When you've figured out the sequence in which to perform all the tasks, you will find that the project becomes a bit easier to understand. You will also save yourself the extreme frustration of having to go back and remove parts that you've already installed when you find out that you got the sequence wrong and that this new part goes in behind the work you've already done. In short, planning is one of the keys to making any project one you will enjoy and complete, rather than one you will give up on and sell to someone else to complete.

One of the first things I needed to do with my project was to swap out the transaxle. For you non-car people, the transaxle is the thing that has all the gears inside it that you will later be shifting with the gear shift lever that you will install later. The transaxle is also where the power from the engine is transferred to the wheels so that the car can more forward and backward. The transaxle is where you attach the engine to the car, too, so you can see that it's installation lines up early in the assembly sequence.

This particular dune buggy is built on a 1957 floor pan. One bit of advice, don't assume that the old rubber mounts that have been holding the old transaxle onto the pan for the last forty-two years will be adequate to hold the new transaxle which you are about to mount on the car. If you do that, you will soon have to replace said rubber mounts with new ones, and take it from me, it is much more difficult to do that when you've already bolted the transaxle and engine in place in the car.

Everything and anything is always and forever based on fundamentals. Fundamentals are those basic building blocks upon which everything else stands. They are your foundation. Fundamentals are simply basic truths. Everything on your car is attached to, or rests on top of, the frame. All the parts of your car depend upon other parts to function. If the parts are not attached to a solid foundation, their relationship to each other will change at the whim of every bump in the road. This will ultimately result in the untimely demise of some vital element. What this means to you is that if your fundmentals are solid and true, you will get where you need to go. If they are not, you will wind up stranded somewhere waiting for someone else to come along and help you. You might think this could apply to life and living. Surprise!! It does, indeed.

So, here's the sequence: 1. Remove the old transaxle, 2. Remove the old rubber mounts, 3. Install the new rubber mounts 4. Install the new transaxle. Or, you could do it the way I did it: 1. Remove the old transaxle. 2. Install the new transaxle, 3. Drive the car for a couple of years until the old rubber mounts fail and the transaxle is flopping around trying to destroy itself and everything else at the back of the car, 4. Figure out a way to change the rubber mounts without removing the engine and transaxle, 5. Spend a couple of hours lying upside down under your car changing the mounts. I highly recommend the first method over the way I did it, but it's your call.

Monday, June 29, 2009

Resources

Resources

I don't know if kit cars come with instructions. I suppose they must. If there ever were instructions for the car that I bought, they had long since been lost by the time it arrived in my back yard. There were a few things I already knew how to do, such as remove and install the engine, fix the braking system, replace the worn parts in the suspension systems, and, of course, sand away the rust and repaint the bare metal surfaces. Those are all important things to know, and I was glad I had learned them over the years, but I had never started a project that was quite this much of a blank canvas.

The first thing to do was to make a list of what it would take to make a car out of this thing I had bought. What are the components of a safe, dependable automobile? There are some systems that you just can't do without: brakes, suspension and steering, fuel, oil and electrical. In addition, you'll need something to sit on while you drive and a windshield to keep the bugs out of your teeth. There are some items your family car came with that you can do without when you're building a simple dune buggy: heater, air conditioner, radio, windows, carpet, cup holders, interior lights, and a glove box. After a quick evaluation of what I had to work with, I made my list: engine, carburetor, distributor, ignition wires, oil cooler, engine sheet metal, generator, voltage regulator, fuse box, transaxle, rear brake drums, shock absorbers, tires, wheels, speedometer, battery, headlights, tail lights, turn signals, brake master cylinder, wheel cylinders, brake shoes, brake springs, emergency brake cables, clutch cable, accelerator cable, hoses, and wires, lots and lots of wires.

The next step was to get the basic components ordered, so it was off to B.C.E. with my list. I ordered parts, got lots of advice and went back to sanding and painting. I also sent the wheels off to be powder coated. Since the body of the car was yellow, I thought black wheels would contrast nicely and make it look at bit less "cute" and a little more aggressive. Plus, the powder coating is very, very hard, which means it resists scratches and keeps the underlying metal part from rusting, an important consideration for a car that was destined to spend most of it's life outdoors in all sorts of weather. The wheels that came with the car seemed to be sound, so those are the ones I sent to the powder coater.

I kept thinking that this project was just too easy. All I had to do was wait for the parts to come in and then just put it together. I didn't realize then, how much I had yet to learn.

Friday, June 26, 2009

Relying upon Past Experience

Patched and Painted Floor Pan

When I was fifteen years old, I lived with my family in Peoria, Illinois. One of the most exciting aspects of being fifteen is the prospect of driving a car when you turn sixteen. My high school had an exceptional driver's education class that included not just classroom theory, but actually driving in cars donated for that purpose by local dealerships. I managed to get through the class without destroying any of the cars, which, at the time, was surprising to me and my instructor. Sometime during that year, my father acquired a 1950 Willys Jeepster which he gave to me as a first car. I was excited, of course, and, since I didn't have my license yet, I spent hours backing it up and turning it around in our two car driveway. The poor old Jeepster had not been well cared for and I was expected to fix it up and make it more drivable. I was given a shop manual for the car and was turned loose to figure things out for myself. I wasn't told about the cracked engine block, which would eventually be the death of that car.

One of the first things I discovered about that Jeepster was that the floorboards at the front of the car were mostly rusted away. There was nothing in the manual about rusted floorboards, so I was on my own as to how to fix them. I dug up some sand paper from the garage and found a wire brush that I could attach to my dad's electric drill and started removing rust. The more I sanded and brushed, the worse the floorboards looked. It seemed like the rust was the only thing holding the car together. Once I had removed the rust down to somewhat sound bare metal, I scrounged some spray paint from friends, whatever color I could get, and painted the metal to keep the rust from returning. Now I had to figure out what to do with the foot sized holes in the floorboards. There were some scraps of galvanized sheet metal in the garage left over from some project my dad had worked on and I figured those would work just fine to cover up the holes. The scraps weren't very big so I had to piece them together to make a patch large enough for each of the holes. I attached the scraps to the floor with various sizes of sheet metal screws and then painted the whole mess with more scrounged spray paint. It wasn't an elegant solution, nor, ultimately, did it work very well, but it did keep my feet from dragging on the ground while I drove the car. I didn't quite get the floor completely sealed, though, and so whenever I drove it in the rain, water would shoot up through the floor as I splashed through the puddles on the street.

As I think back on that car and my feeble efforts at restoration, I see that I was adrift on a stormy sea with no compass and no charts. None of my very limited number of friends knew anything about automobile repair. My father knew less than I about the subject, plus, in those days, he was away on business a great deal of the time, and my mother never encouraged me to do anything but be quiet and stay out of trouble. The only thing that kept me going was that potential status I would achieve by being one of the elite few who had his own car. It turned out that hardly anyone was impressed by my old rusty car with the leaking floorboards. The car eventually died when the crack in the block got so large that the cooling system and the engine oil system began exchanging fluids at a rate which allowed neither system to function. So, with no resources, no encouragement and no support for my restoration project, I gave up. My dad sold the car. He told me he was disappointed that I hadn't taken more of an interest in fixing up the car. Later in life I learned that when one is given a project, it is always good to find out what the expected outcome is. At the time, I had no idea that my dad was trying to encourage me to learn about car repair. There needed to be a stated goal for the project and there never was. I just figured I was supposed to try to keep the thing running so I'd have something to drive and wouldn't have to borrow the family car. None of us had any idea what it would take, or how much it would cost, to restore that car, and we never did sit down and discuss the project. Of course, we rarely sat down and discussed anything except the latest instance of unacceptable behavior I had exhibited.

A hard-won piece of wisdom that I have acquired is that if you perform an action which has as it's only purpose to please someone else, you will rarely follow through and succeed in that action. So, if your sole purpose in building a car is to impress other people, don't even bother to start the project. No one will ever be as impressed as you believe they should, and you will eventually give up and have to sell it, or you will end up paying someone else to finish it. However, if you start your car project with the idea that, upon completion, it will bring you the joy and satisfaction of a job well done, and give you a sense of accomplishment, then go for it! If you consider the project a worthwhile task in and of itself, you'll most likely succeed. If you think of the whole project as a learning experience, you will approach the problems that arise as a challenge, rather than a roadblock on your journey, and you'll not be as likely to give up just because it is more difficult that you expected it to be.

I suspect that this is part of what motivated me to start my dune buggy project. I really did want to take it on as a challenge, to prove to myself that I could do it. Most of all, I wanted a dune buggy to drive. I thought it would be fun to drive around in a unique little car that I had built myself. That's why, when I saw all the rust on the floor pan after I removed all the dead leaves from the inside of the car, I was not discouraged. I had seen worse, and I knew I could repair the damage. I moved the car into the garage, got out my sandpaper and the drill with the wire brush attached and got to work.

Monday, June 22, 2009

Resurrection

Day One

If I have a Volkswagen related question, the first place I go to seek an answer is to my friends at B.C.E. in Eagle Rock, California. I have learned over many years and with many different cars that, as a used car owner, you will be more satisfied with the help and advice you get from a small privately-owned shop than that which you will receive at a dealership. With a new car, this advice doesn't hold true, and in that case you should find a dealership which you feel will treat you fairly and honestly and stick with them until your warranty runs out. But, if you're looking to build a dune buggy, you had better find yourself a local shop and make lots of friends because you're definitely going to need them.

When my wife and I moved to Los Angeles, we travelled in our own caravan. I drove the twenty-two foot Ryder truck and my wife drove our Jeep Wagoneer towing the 1966 VW Squareback. The truck was packed high and tight, and so were both cars. By the time we arrived in L.A., the constant velocity joint in the Jeep's drive train was within minutes of disintegrating, you could hear it squeaking blocks away, so one of the first things we needed to do was unhook the little VW and go find some parts for the Jeep. It started right up, of course, but as it had bounced along behind the Jeep on the journey from Steamboat Springs to Los Angeles, the bolt holding the cooling fan onto the engine had worked itself loose. I knew what the horrible scraping sound was right away, so I unpacked my tools, tightened up the bolt and we were mobile again. That's what I like about Volkswagens, they're simple and, mostly, pretty easy to fix. All you need is a source of parts and advice and you can make them last a very, very long time.

I don't know exactly when I discovered B.C.E., but I know that it wasn't very long after our arrival in Los Angeles, probably sometime in late 1984 or early 1985. From my first experience with them, I knew I had found the shop I needed to help me keep that old Squareback running. The B.C. of the B.C.E. was Bob Costa, and until his death just a year and a half ago, he was my VW guru. I always planned on spending at least two hours at his shop, no matter what the reason was for my visit. Often I just stopped by to pick up a part or two, but there were always so many interesting things going on there that small errands always took much longer than anticipated. In between innumerable phone calls which he'd have to take, Bob and I would talk about Volkswagens, we'd talk about life, and we'd go over what I needed to do to fix whatever problem I came to him about. It was wonderful. I learned a lot from Bob Costa in the almost 25 years I knew him. His wife runs the shop now and does a credible job of taking over where he left off, but she and I and all his other long-time customers miss him.

When I decided I wanted to build a VW dune buggy, obviously, the first person I needed to talk to was Bob Costa. I went to his shop that day just to find out if there might be someone, somewhere who was still making a kit to convert an old VW into a dune buggy. As we were discussing the various aspects of this proposed project, one of his other customers said that his dad had a dune buggy in his driveway and might be willing to sell it. Well, now this was intriguing and so I arranged to go look at this alleged dune buggy.

When my wife, Carol, and I arrived in Mt. Washington where the dune buggy was supposed to be, we parked in front of a house with a long and very steep driveway filled with cars. As we walked up the driveway there was this yellow thing that looked like it might be a dune buggy buried underneath some plastic tarps. We looked underneath the weathered and leaf-covered plastic and there it was, this yellow fiberglass boat-like thing filled with dirt and dead leaves. The fiberglass was dirty, what metal parts we could see were rusted and corroded, there were loose wires hanging from underneath the body and it had no engine. My wife had this horrified look on her face. All she could see was the dirt and decay. I, on the other had, saw potential. There's a car under there, I thought, if I can recover it from the neglect that it has been subject to over the last few years. After some discussion, Carol agreed to let me try to salvage this mess and make a car out of it. At the time, she didn't really believe it was possible. I was determined to prove her wrong.

First Bath in Twenty Years

A week later, after the former owner had moved all the other cars in his driveway out of the way, I went back to Mt. Washington, hooked up the little car and towed it home. We parked it off to the side of the driveway and gave it it's first bath in nearly 20 years. Underneath the filth, dead leaves and spider webs were all the basics of a good-looking little yellow car. It had no engine, no electrical wiring, no brakes, and rust holes in the floor pan, but it appeared to be fundamentally sound. My job would be to resurrect it from the rust and decay and transform it into the safe, reliable and fun little car that it was intended to be.

Wednesday, June 17, 2009

My First Volkswagen

1966 VW Type III

I don't know exactly when, but at some point when I was much younger, maybe nine or 10 years old, my dad had sent for and received an information package about some sort of kit car. As I recall, he was quite enthusiastic about it. It was a new concept for me at the time, this building your own car from a kit, and rather intriguing. That memory stay with me, lying dormant for many years until one day I was struck with the urge to build my own car. I'm not sure why I wanted to build a car, second childhood, perhaps. Like many of my ideas, I had no idea what I was getting into.

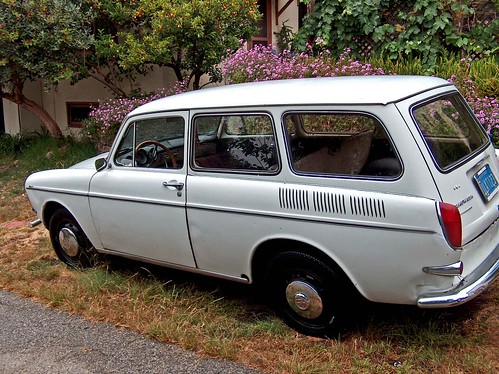
I've owned a lot of cars over the years, some good, some not so good. One of my favorites, and the one that I hung onto the longest was a 1966 Volkswagen Station Wagon, a.k.a. Squareback or Type III. I first saw it when I was asked by an employer to move the car out of a parking lot so that the lot could have the accumulated snow and ice removed down to solid ground. When I walked up to the car, it was barely visible, having spent the first part of the winter parked in that spot while the owner was at his home in Texas. He only owned the car so that he could have it available to him when he visited his condominium there in Steamboat Springs, Colorado where he occasionally came to ski or enjoy the mountain scenery. The rest of the year the car just sat there and the condominium was available for rent to tourists.

The first thing I had to do was uncover the car, including digging out the snow alongside the driver's side door so that I could get it open. Have done that, I crawled inside, found the ignition switch, inserted the key and gave it a turn. To my surprise, when I turned the key, the started growled and the engine cranked. That in itself was impressive, given that the temperature was well below freezing and had been for several weeks, along with the fact that the car had not been started or driven for months. The engine didn't start right up, but it did turn, so I pumped the accelerator pedal a few times and tried again. After a few more tries, the engine caught and began to run. It made a horrible sound, as if the whole thing was grinding itself to pieces, but, amazingly, it kept running. I let it run, hoping the horrible sounds would stop once the engine warmed up. Eventually they did, after a few minutes, and so I was ready to try to back the thing out of the hole where it sat. I grabbed the gearshift lever, pushed in the clutch pedal and put the transmission in reverse gear. When I was digging the show out from around the car, I had noticed that the rear tires where rather worn, with almost no tread left on them, so I had little hope that the car would actually be able to move itself over the ice and snow. I was so very wrong. As I gently engaged the clutch, the little car crawled right out of the hole. I moved it to clear spot in the parking lot, shut if off and returned the keys to my employer's office. I was impressed with this little car and I decided that if it ever came up for sale, I would put in a bid for it.

Later that year, the owner of the car decided to sell his condo. When I found out about the pending sale, I asked my boss if he was going to sell the car as well. The answer was, "Yes." I offered him $400 for the little white car and he accepted. I now owned my first Volkswagen.

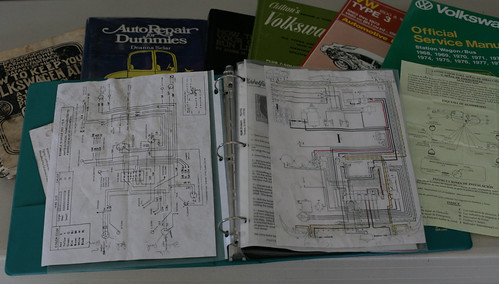
One of the things I always do when I purchase a car is to acquire a shop manual for it so that I can do some of the minor work, such as tune-ups and oil changes, myself. I discovered that there was a unique manual available for Volkswagens called How to Keep Your Volkswagen Alive, A Manual of Step-by-step Procedures for the Compleat Idiot by John Muir. I bought one. I still have it. I still refer to it occasionally. I learned a lot about Volkswagens from that manual, and a lot about auto mechanics in general. It's a great book, well written, easy to understand and follow, and a valuable resource for someone like me. That book helped me keep that car alive until just a few years ago when I passed it along to someone else, sans engine. After over 30 years, I still own parts of that engine.

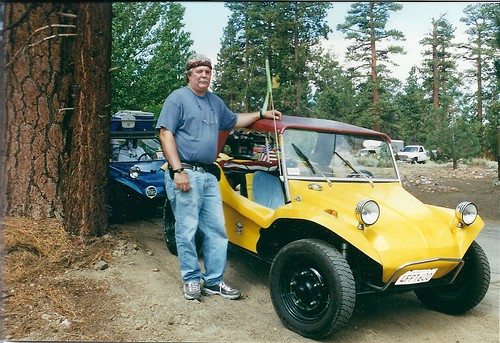
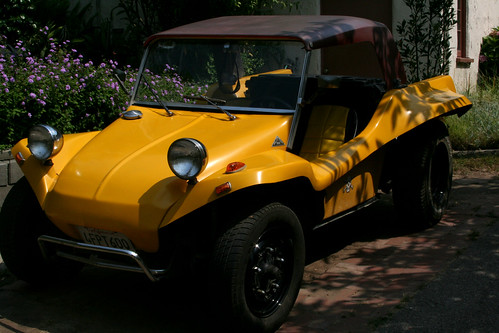
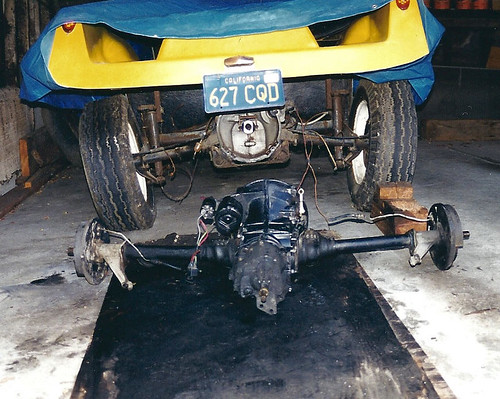
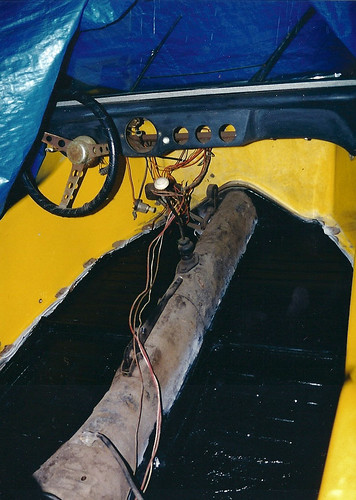
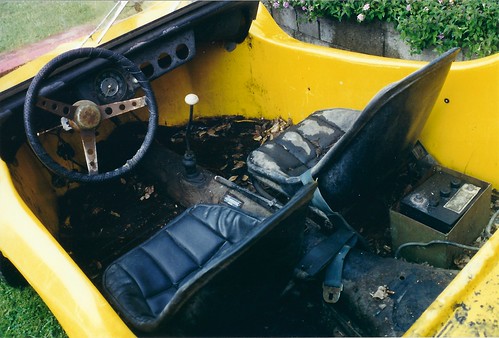
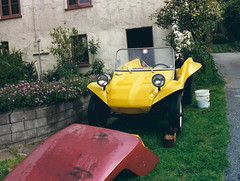
When the urge to build my own car welled up within me, it was natural to think of using Volkswagen parts to build it. VW parts are modestly priced, readily available, and well suited for incorporation into a kit car project. So, I decided to build a Dune Buggy. I knew that, at some time in the past, there had been kits available for such a project, all I had to do was find one.

Monday, June 8, 2009

Once Upon a Time

Dead Eye's Car 3

When I was a kid, I used to take things apart to see how they worked. It wasn't until later in life that I learned to pay attention to how the things came apart so that I could put them back together again. It was a lesson learned the hard way. Just like the lesson I learned about reading instructions. I'm not sure when I started reading instructions. It was probably about the same time that I realized that no one I knew was going to explain to me how anything worked. By anything, I mean everything. By everything I mean cars, clocks, airplanes, plants, people, mathematics, language, spelling, history, philosophy, sex, human relations, personal hygiene, nutrition, plumbing, heating, electronics, carpentry and telephone etiquette. Lucky for me, the Boy Scouts of American came along and taught me a bit about personal hygiene, cooking, camping, tying knots, American history, canoeing, leadership, human relations and wilderness survival. Almost everything else I know, I learned by trial and error or by reading instructions.

It's a damned shame that we have to come into this life and learn everything the hard way. By "the hard way" I mean the hard and painful way. The first time you try to stand up and walk across the room, you fall on your butt. If you're a male of the species, the first time you try to talk seriously to a female of the species, you mess it up and nearly perish from embarrassment, or at least, most of us do. And that's another thing for which I've never been given a satisfactory explanation. Are female and male humans actually the same species? I'm not too sure about it. There are unexplained fundamental differences between males and females, and not just the obvious ones either, that, to this day, very often leave me wondering.

The problem is, you see, there is no instruction manual issued to us at birth. Why is that? You would think, after thousands of years and uncountable libraries' worth of writings, that someone would have written up a simple, easily understood operator's manual for human life. Oh sure, we've got shelves and shelves of philosophy and religion to read, but those subjects require years of study to be comprehensible. We've got medical books, cookbooks, encyclopedias, textbooks, and novels. But where is the simple fifty-page operators manual for being a human being? Where is the book entitled "Welcome to Earth, Human. (An operators manual for living.)" with a glossary of commonly used words and a index so that you can quickly find what you need to know?

If you think I going to write one for you, you'd better think again. What I would like to do, though, is to share with you a bit of what I've learned about life and how it works, or, at least, how it works for me. I don't claim to be any shining example of human virtue, or the best mankind has to offer, nothing like that at all. I'm just the guy next door who might lend you a wrench, or help you patch your tire, or give you a hand loading your old couch into your pickup, or take care of your cat while you're on vacation. Maybe you'll find something useful in my stories, or something amusing. I'm hoping you'll find some of both, but we'll see how it goes as we roll long here.