Tuesday, July 28, 2009

Wires, Wires and More Wires

Wiring Diagram

For me, the most difficult part of building the dune buggy was the wiring. Before I even started, I had to decide how much wiring I wanted to have in the car. This meant I had to decide what I wanted to include in the project in the way of accessories, gauges, sound equipment, lighting and whatever else might need electrical power. I also had to decide which wiring route I wanted to take. I could buy a complete VW sedan wiring harness for a little over $200, or I could buy a dune buggy wiring harness for about $65, or I could buy bulk wire from the hardware or auto parts store and design my own harness.

The first thing I did was to find an understandable wiring diagram of all the basic systems normally found in a Volkswagen. I found a vintage hardback Chilton's tune-up manual in a used book store that had a decent diagram which showed the basic circuits I would need to get the car running. I scanned the diagram into my computer, printed it out on two sheets of paper, taped them together, got out some colored highlighters and started outlining circuits. I decided that, since it was to be an open car, I would include only the essential electrical accessories, so as to keep weather damage and theft to a minimum. For a safe, running car I would need wiring for headlights, turn signals, tail lights, running lights, brake lights, instrument lights, engine warning lights and windshield wipers. To go with the lights, I would need a headlight switch, a dimmer switch, a turn signal switch, a brake light switch, a wiper motor switch, a gas gauge and sending unit, and an oil pressure switch. I would also need wiring for the engine electrical system. It looked to me like the dune buggy harness would just about cover all of those circuits, so I ordered the necessary harness and switches.

With the diagram and the parts list done, it seemed like the actually wiring would be fairly simple and straightforward. It really should have been, but it wasn't. When you are dealing with parts and wires that have never been put together in this particular fashion ever before, there are always going to be problems to solve. There were.
Tuesday, July 7, 2009

Parts and Systems

Ready For Another Trip to Big Bear Lake

Just as each project breaks down into smaller parts, the car itself breaks down into systems and major components. Here's what I consider the major parts and systems of an automobile.

Frame
Body
Suspension System
Engine and Drive Train
Engine Cooling System
Engine Electrical System
Body Electrical System
Braking System
Fuel System
Guidance System

You have to have all these things to have a safe, street-legal vehicle, whether it be car, truck, or motorcycle. In a dune buggy, you can get by with the bare minimum of most of these components. You may have noticed some things missing which you consider necessary on your own car, such as a heating and air conditioning system, or a sound system. You can add these to a dune buggy, but for a vehicle which is designed to go off road, as well as on the highway, it is best to keep things to a minimum. Extra weight and delicate electronics are not necessarily well suited to climbing hills or blasting through mud puddles in the rain. Some people feel that they can't do without such luxuries and add heaters, stereos, side-curtains with plastic windows, carpets and such to their buggies. I would be reluctant to expose that sort of car to mud puddles in the rain, or extremely dusty conditions, but some people do so and take whatever consequences that arise.

The above major parts and systems each break down into smaller sub-systems.

You would think that the frame is just the frame, but there are main frame members and braces and cross members on some frames. The Volkswagen frame started out at the factory as a welded one-piece floor pan, but over the years, parts of that floor pan are prone to rusting, so sometimes it is necessary to remove the floor parts and weld in new ones. On some VW-based dune buggies, including mine, these pans are shortened by a little over a foot, resulting in a smaller, lighter, more agile, but less roomy car.

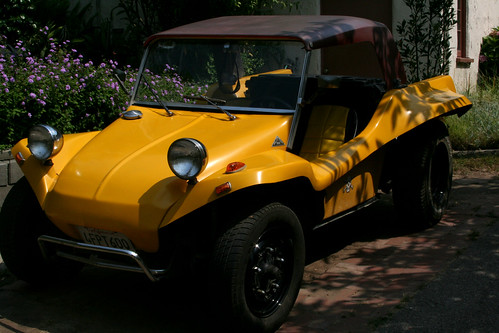
The body of a car can include doors, windows, hood, trunk, top, and seats. In that case there is a break down into interior and exterior body parts. In my dune buggy, there is the body, a windshield and two seats. That's pretty much it. The body is in three pieces, the main body which includes the fenders and the rear deck, the front cowling, and the dashboard. There is also an optional roof which isn't ever necessary, though it makes the car much more comfortable by keeping the sun and the rain off your head. The windshield in my dune buggy is a separate assembly and bolts to the main body at the sides. There are no carpets, no heating systems, no air conditioning systems, no cupholders, no center consoles, no arm rests, no doors, no side or rear windows, and no box for your gloves.

What I like most about my dune buggy is how very simple it is. I tell people that it consists of the fewest parts you can put together and still have something you can call a car. The other systems outlined above break down into more complicated parts. I will write about those in future blogs. For today, it's enough to have looked at how you can break down a car into parts and systems to make it more easily understandable and less overwhelming. Every time I get out the tools and work on my cars, I learn something new. That's the most wonderful part of building your own cars, they teach you things about themselves and about life in general if you're willing to listen.

Sunday, July 5, 2009

One Step at a Time

Transaxle

The only way to keep from getting completely overwhelmed by this kind of project is to break it down into simple, individual tasks, such as: 1. Remove old transaxle, 2. Install new transaxle, 3. Install new rear brake backing plates, etc. Once, you've done this, you will be able to see the sequence in which these tasks must be done. You can't install the engine until you have swapped out the transaxles, and you can't install the new brake shoes until you've attached the backing plates and the new wheel cylinders. It's like that old song, "Them Bones," where you learn that the hip bone is connected the the thigh bone and the thigh bone is connected to the knee bone. When you've figured out the sequence in which to perform all the tasks, you will find that the project becomes a bit easier to understand. You will also save yourself the extreme frustration of having to go back and remove parts that you've already installed when you find out that you got the sequence wrong and that this new part goes in behind the work you've already done. In short, planning is one of the keys to making any project one you will enjoy and complete, rather than one you will give up on and sell to someone else to complete.

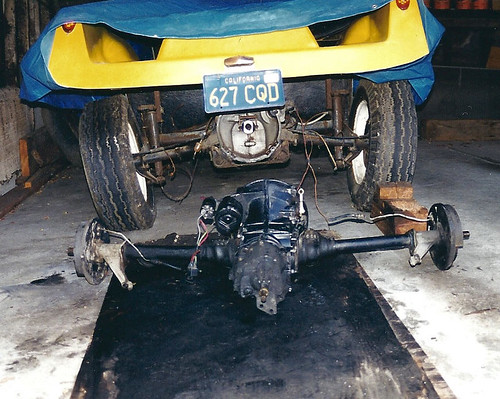
One of the first things I needed to do with my project was to swap out the transaxle. For you non-car people, the transaxle is the thing that has all the gears inside it that you will later be shifting with the gear shift lever that you will install later. The transaxle is also where the power from the engine is transferred to the wheels so that the car can more forward and backward. The transaxle is where you attach the engine to the car, too, so you can see that it's installation lines up early in the assembly sequence.

This particular dune buggy is built on a 1957 floor pan. One bit of advice, don't assume that the old rubber mounts that have been holding the old transaxle onto the pan for the last forty-two years will be adequate to hold the new transaxle which you are about to mount on the car. If you do that, you will soon have to replace said rubber mounts with new ones, and take it from me, it is much more difficult to do that when you've already bolted the transaxle and engine in place in the car.

Everything and anything is always and forever based on fundamentals. Fundamentals are those basic building blocks upon which everything else stands. They are your foundation. Fundamentals are simply basic truths. Everything on your car is attached to, or rests on top of, the frame. All the parts of your car depend upon other parts to function. If the parts are not attached to a solid foundation, their relationship to each other will change at the whim of every bump in the road. This will ultimately result in the untimely demise of some vital element. What this means to you is that if your fundmentals are solid and true, you will get where you need to go. If they are not, you will wind up stranded somewhere waiting for someone else to come along and help you. You might think this could apply to life and living. Surprise!! It does, indeed.

So, here's the sequence: 1. Remove the old transaxle, 2. Remove the old rubber mounts, 3. Install the new rubber mounts 4. Install the new transaxle. Or, you could do it the way I did it: 1. Remove the old transaxle. 2. Install the new transaxle, 3. Drive the car for a couple of years until the old rubber mounts fail and the transaxle is flopping around trying to destroy itself and everything else at the back of the car, 4. Figure out a way to change the rubber mounts without removing the engine and transaxle, 5. Spend a couple of hours lying upside down under your car changing the mounts. I highly recommend the first method over the way I did it, but it's your call.