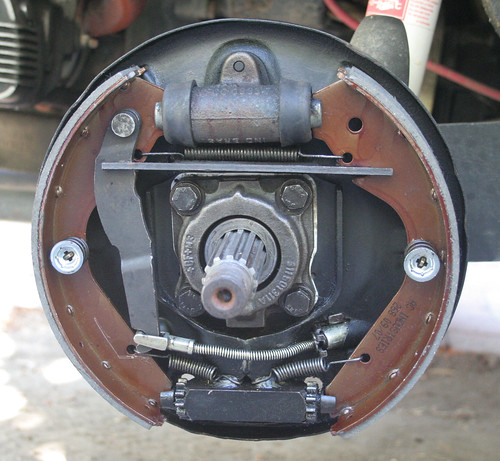
With the transaxle installed it was time to install the brake system. At the suggestion of my friends at B.C.E., I decided to put Type III brakes on the rear of the car, rather than the '67 style that came with the car. All the moving parts that had come with the car when I bought it were worn out anyway, so there was no reason not to start from scratch. The advantage of the Type III-style brakes is that the brake drums are substantially wider than the stock '67 drums, thus providing more surface area for the brake shoes to contact. More surface area means more friction which translates into more stopping ability. The disadvantage of changing to the Type III set-up was finding the parts. After some searching around, though, we got everything I would need to do the installation: backing plates, wheel cylinders, springs, shoes, drums and the emergency brake hardware.
I didn't trust anything that had come with the car, so I was replacing the whole system, including all the steel lines, the rubber lines, master cylinder, all four wheel cylinders and all the drums. It may not sound like much, but that's a lot of pieces: seven steel lines that have to be bent into the right shapes, four rubber lines, four wheel cylinders, four brake drums, four sets of brake shoes, four sets of hardware which includes springs and pins and retainers and adjusters, a brake fluid reservoir and a couple of pints of brake fluid. In addition, there are wheel bearings and seals and grease to deal with as well.
Getting the new brake lines installed was not too difficult. You just have to be careful not to bend the steel lines too sharply or you'll kink them, making them useless. The sequence is to bolt the new master cylinder in place and go from there. There is one long steel line that runs from the front to the back of the car where it attaches to a splitter that lets you hook up the right and left sides with shorter steel lines which attach to flexible rubber lines which, in turn, attach to another set of short steel lines. At the front there are two steel lines that attach to rubber lines on each side of the car. The objective is to end up with nice, clean, unobstructed lines that let you push the high pressure brake fluid from the master cylinder to the wheel cylinders. Pushing the brake pedal causes the master cylinder to pump the brake fluid to each of the four wheel cylinders which push on the brake shoes. The brake shoes rub on the inside of the brake drums and the resultant friction is what slows and stops the car. When all of the parts are adjusted correctly and working properly, you have a vehicle that slows and stops in a predictable manner. When you completely redo you own braking system, you gain an understanding of how the system works, and after that, it is very easy to figure out what is wrong when you encounter braking problems.
At the end of each of the four brake lines is a wheel cylinder, one for each wheel. These are mounted to a backing plate to which are also attached the brakes shoes and adjusters. The brake shoes are attached with pins and springs and fit into slots at the ends of the wheel cylinders and adjusters. The parts for the front of the car are different than the parts for the rear of the car, especially when you are mixing and matching years and models as I was. Mounting the front brake shoes and drums is rather straightforward. I installed new wheel bearing and seals in the new drums and had the front together in short order. Mounting the rear brake shoes is very similar, except you need to attach the actuating lever for the emergency brake to the rear brake shoe on each side and attach the emergency brake cable to the lever. That part is easy. Sealing up the rear axle turned into a series of errors and disasters which have continued until only a few days ago. It was another lesson that I wound up learning the hard way.


No comments:
Post a Comment