You'll sometimes hear an artist describe one of his or her creations as "A Work in Progress." To me this means that, though the artist might know what the finished work should look like, he/she hasn't quite gotten the thing to that point yet. My cars fit this definition, both the dune buggy and my Baja bug are, if nothing else, Works in Progress. The Baja bug is the best example of that concept as far as my cars are concerned. The dune buggy could be consider finished, Though there are a number of things I still want to do with the buggy, it is quite useable in its present state of completion.
A few years after I got the dune buggy into the semi-completed condition in which it has existed ever since, I felt the need for another project. I must have forgotten how much time, effort, blood and sweat had gone into the dune buggy build to have even considered starting to build another car. It was either that or some unsatisfied creative need that resides deep inside my psyche which occasionally forces its way to the surface, there to dwell until a sufficient quantity of the aforementioned time, effort, blood and sweat have been invested to cause it to subside to a point where I can return to my otherwise rather sedate life. It's not that my life isn't interesting, it's not that at all. It's just that I have always been driven to be creative in some way or another, and there's nothing that challenges one's creative abilities more than taking an old rusted-out shell of a car and turning it into a safe, reliable vehicle.
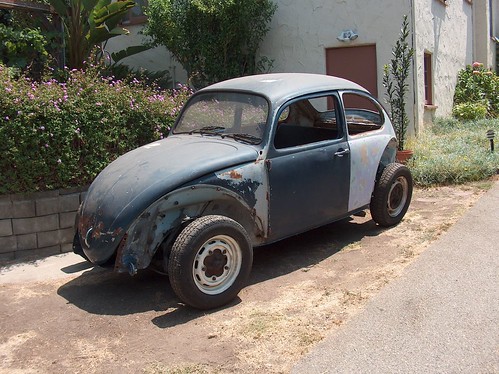
In the case of the Baja bug, when I first saw the shell that would someday be restored to a car-like state of existence, I felt as if I was rescuing the poor abused thing just moments from its being send to the scrapheap to be cut up, crushed into a cube and melted down. It was what was left of a 1967 Beetle, after all, and legend has it that 1967 was one of the best years for the old air-cooled VW Beetles. It was also a perfect candidate for transformation into a Baja-style bug, since both the front and rear of the car were in rather poor shape, and the fenders all missing, while the middle of the body was in relatively good condition, or so it appeared. Having successfully built a dune buggy, I thought I knew was I was getting into when I hooked up the barely rolling hulk to the back of my pick-up truck. Of course, I was wrong, but then, I usually am when it comes to this sort of thing.
Once I got the hideous wreck installed in the parking space behind my basement door, I began to realize the magnitude of the project I had just begun. This thing needed everything: window glass, seats, a steering wheel, gauges, a hood, fenders, door handles, interior door panels, an engine, a transaxle, brake lines, electrical wiring, headlights, turn signals, windshield wipers, tail lights, bumpers, a gas tank, fuel lines, brake lines, brake shoes, brake backing plates, brake springs, a brake master cylinder, brake wheel cylinders, brake drums, wheel bearings, wheels, tires, a fuel pump, carburetors, an alternator, a battery, a battery box, battery cables, and a wide variety of other parts and hardware. When I bought the dune buggy, at least it had a body, fenders, a front windshield, a steering wheel, seats and front tires, wheels and brakes. For the dune buggy, I didn't have to worry about doors, side windows, rear windows or body parts. This project would need all those things, plus a bit of body work on the middle part of the car. It was all a bit overwhelming. I know how to handle "overwhelming," though, and I began making a list. If you make a list of what you need, you can begin to get the project organized. As you make your list, parts fall into categories and that lets you break the project down into sections and from there into individual tasks. Once you begin to understand what needs to be done, you can start to figure out when in the sequence of the build each step has to occur. The first parts that have to be installed are the transaxle and the engine. Before that can be done, the old transaxle must be removed. If you are going to install a new transaxle, you'll want to install new mounting hardware at the same time and while you're under there, after you've got the new transaxle installed, you might want to take care of replacing the rear brake lines, since it's a lot easier to work in that space without the engine in place. Since this is a Baja bug project, you'll want to do your cutting off of the rear part of the car before you install the engine, too. And here, once again, we run into the problem that there is no real instruction manual available for Baja bug building. Planning, it's all about planning.
Before you can even start buying parts for your Baja bug project, it might be a good idea to have some idea what the final product should look like, what performance level you are trying to achieve, and, perhaps, how much money you are willing to spend. I knew I wanted a one-piece fiberglass front end and some rather wide rear fenders, all of which were offered for sale at one of my favorite on-line suppliers, J.C. Whitney. Not only did they offer the parts I wanted, but their price was about what I wanted to pay. So, I placed my order. In the meantime, I started sanding and repairing the middle part of the car's body. At about the same time, I ordered the engine and transaxle and most of the other parts I would need to move forward once I had the fiberglass parts in hand. For the first time in a great many years of buying and receiving parts from J.C. Whitney, they let me down. The fiberglass parts that they offered were not going to be available for months, if ever, so I was forced to cancel my order and find another source for what I needed. After a bit of on-line research, I found Mark V Fiberglass. They had what I needed, or at least would have it a whole lot sooner than J.C. Whitney, so I placed my order and went back to sanding and pounding out dents in the body while I waited.


No comments:
Post a Comment