Sunday, May 26, 2013

The Curse of the Little Red Car

Airing Out the Engine
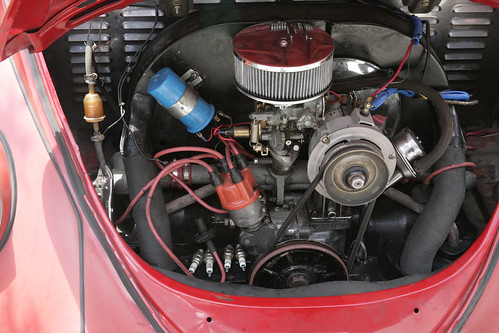
Once again, my ’65 VW Beetle has developed a problem.

I’ve been having some sewer pipe work done at my house which has made the driveway inaccessible. I needed to move a car out of the driveway just in case I needed one. With three cars to choose from, I figured that the ’65 Beetle with its locking engine compartment would be the hardest to steal. I moved it out into the neighbor’s driveway where it was only occasionally blocked by all the construction equipment. I used it a couple of times during the week and it ran and drove just fine.

On Friday, my neighbor needed to get his own car out of his driveway, so I moved the Beetle out onto the street. We live on a rather steep hill. Since the gas tank was full, I parked the car nose uphill in the morning so the gas wouldn’t leak out of the tank. In the afternoon of that same day, I went out to start it up and head off to a meeting. I turned the key in the ignition and only got a “click.” I thought, “Okay, the battery has gone dead. I’ll deal with that after I get back home.” I fired up the dune buggy and backed out of the driveway over the top of the wooden and metal covers on the three holes where the repair guys had been working earlier in the day. That was fine and I made it to my appointment only a few minutes late.

When I returned home, I went out to Beetle to see if I could figure out exactly what was wrong with it. When I tried to start it, I still only got this “click.” It sounded very similar to the sound I’d heard before when the battery didn’t have enough charge left to turn the starter. It wasn’t exactly the same sound though and the dashboard lights didn’t really indicate to me that the battery was dead. Still, I gave it the benefit of the doubt and took the battery out and put in on the charger in the basement.

A few hours later, the battery was showing that it now had a fair amount of charge available. Certainly enough to get the car started so that I could move it off the street. I put the battery back into the car and hooked it up. Still just a “click.” Okay, maybe something is locked up and I can bump the engine by popping the clutch with the transaxle in reverse and get it turning. I let it roll back a bit and engaged the clutch. Wham! A dead stop. I tried it again. Same result. Okay, the engine won’t turn over at all. The problem was now increased in magnitude from the simple dead battery to a possible seized engine. I still need to get it off of the street, though I was beginning to be less concerned about someone stealing it. In fact, I had momentary thoughts of encouraging someone to take it away and put me out of its misery. Instead, I let it roll down the hill and got it partly into the driveway. With our driveway, first you have to go up the driveway before you can go down. With the help of some very kind passers-by, we got it into the driveway and down to where it wasn’t going to be in the way. I left it there for the night.

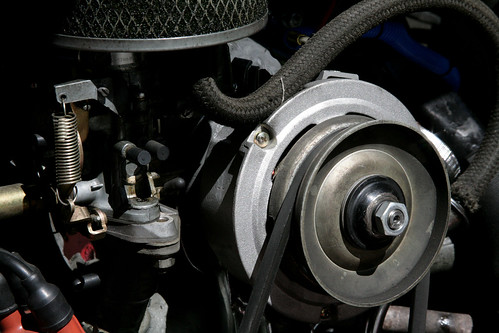
The next morning, when I went out to see what was wrong, I had the benefit of several hours of pushing all the evidence around in my mind. As I approached the car I could smell a strong odor of raw gasoline. With the fact that it had started and run just fine when I backed it out onto the street and parked it; and the fact that the starter couldn’t make the engine turn; plus the fact that bumping the engine by popping the clutch hadn’t worked; I suspected that the engine was filled with gasoline – all of the engine including the manifold, the cylinders and the crankcase. I opened up the engine compartment and, indeed, there was gasoline dripping out of the bottom of the carburetor. It was full of gasoline all the way up the bottom of the carburetor. I didn’t have time to do anything about it at that point so I just moved it farther down the driveway where it would sit more level and left it there.

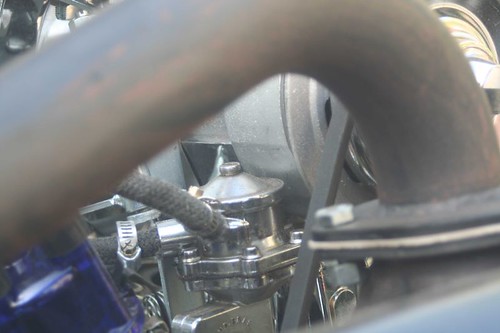
Today, after the car sat for a day in a level spot, there was no more gasoline dripping out of the bottom of the carburetor. So, on the level, there was no more fuel running into the engine. I pulled the oil dipstick. The crankcase was full to the top. I grabbed a drain pan from the basement, put it under the car, loosened the drain plug and watched the result. First, the nice clean, thick oil drained into the pan, it was immediately followed by about a half a gallon of gasoline. My diagnosis was confirmed. While I let the gasoline drain out of the crankcase, I removed the spark plugs. They were all soaked in fuel. I turned on the ignition switch to activate the electric fuel pump and peered into carburetor. Gas was entering the carburetor and the float valve inside was not shutting off the flow when the float chamber was full. In a nose-up position, gravity was causing the fuel to continually run into the engine. Problem identified.

I’m left the spark plugs out and the crankcase drain plug out so the engine will dry out a bit before I go any further. The next step will be repairing the carburetor, putting new oil in the engine, putting the spark plugs back in and starting the engine. At that point I’ll probably be able to tell if there is any other damage. I’m hoping that there are not bent piston rods or valve stems. I did rotate the engine by hand and it seems okay. I’ll have to wait a couple of days for the parts stores to open before I can get parts and continue the repair before I’ll know for sure. I wouldn’t be at all surprised if the engine has severe damage. That would be just typical of how things have gone ever since I bought this car.

I’m beginning to believe that this car is cursed. Maybe I need an exorcist.

Friday, May 10, 2013

High Maintenance

The Fleet
Up until recently, I hadn’t been doing too much driving, once a week, perhaps, at the most, and even then I would drive our Mitsubishi Galant. I’d been writing, working on finishing a book and starting another. No need to go anywhere by car when your job is at home.

A few of weeks ago, a friend called me and made me an offer I couldn’t refuse. He needed some help renovating a building he had purchased and I agreed to help. It was an interesting project and I knew I would like doing the work. The only thing I didn’t find attractive about the job was the twenty-three mile commute each way on the Los Angeles freeways. It takes at least an hour to drive that distance and you don’t go twenty-three miles an hour, instead you go seventy miles an hour and then you stop and then you creep along like an inch worm and then you go fifty miles an hour and then you stop and then it’s back to inching along. It’s a frustrating way to travel and it’s very hard on your car. It proved especially hard on my old Volkswagens.

The first day was a federal holiday so traffic was light and the drive took about thirty minutes. Every day after that it took at least an hour, usually longer. That first day, I drove the ’65 Beetle, the little red car. That was fine and it ran well. By the end of that week, the weather warmed up and I thought I decided to drive the dune buggy. I went to start it and the battery was dead. Not dead like you leave the lights on and the battery is dead. No, dead like this was the battery that got fried when the alternator on the ’65 shorted out and started pumping huge amounts of voltage into this battery to the point where the acid began to boil and blow the caps off the battery. That kind of dead. Dead as in time to buy a new battery. So I did, a nice Sears Diehard. The car started right up.

I did the commute for about a week in the dune buggy. It was a Thursday, I think, when the brakes failed. On the freeway. In stop and go traffic. Fun. You can operate the car by not following anyone too closely, using the gears to slow the car down, downshifting and using the engine as a brake, and using the emergency brake when you have to actually come to a complete stop. You can do it, but it isn’t easy. Or safe. Or fun. I made it home. Okay, I thought, I have two other cars that I can drive, so no problem. Then, when I was driving the ’65 Beetle to run an errand, I noticed that the clutch pedal was sticking. This is a bad sign. Okay, I can still drive the Baja bug.

The Baja bug was drivable, but only barely. When I built it, I equipped it with dual carburetors because I thought that with the 1,776 cc motor, the duals would give me lots of power. They did indeed, but they also dumped enormous amounts of excess fuel into the engine, fouling the spark plugs and causing the engine to misfire and backfire through the carburetors. When it ran right, it was great fun to drive. Most of the time, though, it ran rough, backfired, and required me to drive very carefully so as not to foul the spark plugs. It did run, though, and it was all I had to drive at that point, so I drove it. And then I got stuck in traffic. The freeway was completely stopped ahead of me. I was able to exit just before the stoppage. I know my way around Los Angeles so I decided to go through town to get home. The Baja bug, in its current configuration was not the ideal car for driving across the city during rush hour. It sputtered and coughed and lurched its way through Beverly Hills traffic. It never stopped, but it was a driving experience I didn’t every with to repeat. Something had to be done. It was time to solve all these car problems before I had nothing to drive and was forced to give up this job opportunity because I just couldn’t get there from here.

I took at day and a half off from work and began the process of getting all the cars back in shape. I began by consulting my friends a BCE, the parts store I’ve been depending upon for the last twenty-five years. We came up with a way to make the Baja bug drivable. I’d replace the dual carburetors with a big single barrel. I ordered the parts and they promised to have them by the afternoon of the next day. I drove home to begin diagnosing the problems with the other two cars.

I started with the dune buggy. After I adjusted the brakes, I discovered that the brake master cylinder was leaking. I would need to replace it to get the brakes working again. Next I took apart the clutch linkage on the ’65 Beetle. The front end of the cable was worn paper thin and needed to be replaced. The actuating lever on the pedal was also damaged and needed to be replaced. I recalled an article I had read on the internet about an innovative solution to a long-term VW clutch problem and searched around the web until I found the part that had been highlighted in the article. I like what I saw and the reviews were one hundred percent positive, so I ordered the part.

The company is called Unique Parts and it appeared to be a one-man operation. When I placed the order I made the required Pay-Pal transfer and figured, since it was a Friday, I’d receive the part sometime the next week. I didn’t receive any shipping information that day, so I guessed I’d hear something by Monday. If not I’d follow up and see when I could expect it. The part actually arrived via U.S. Mail the very next day, Saturday. Amazing. Impressive.

My Friday wasn’t over yet, though. I called BCE and learned that they had received all the parts I needed for the Baja bug. I drove over, picked them up, drove back home and began the conversion process. It took the entire rest of the day to finish the project. I checked everything over twice to make sure I’d gotten the new carburetor installed correctly. It seemed to be perfect. I got behind the wheel and keyed the started. It took a while for the fuel pump to fill the new carburetor with gasoline, but once it did, the engine started right up. I took it out for a test drive and it worked very well. The engine was idling a bit too fast, but once I adjusted it down I was satisfied. I almost had a drivable car. The only thing it needed to be perfect was a stereo. I picked one up at Best Buy, found a speaker box at Pep Boys and hooked it up. Now I had one car ready for commuting.

Next step was to repair the clutch cable on the ’65 Beetle. I did that over the course of a few evenings after I got back from the jobsite on the other side of town, an hour at a time. The new clutch linkage installed easily. Not only did it give the cable to actuator lever connection a superior method of operation, but it moved the clutch pedal three-fourths of an inch to the left, making the car much easier to drive. Once I got everything put back in place, I took it out for a drive. The clutch action is smoother and easier. I am confident that it will also be longer lasting. Now, I had two cars up and running.

Since I was making a bit of extra money on this job, I decided that it was time to put and interior into the Baja bug. Up until now, it has just been bare metal inside. From the beginning of the Baja bug project, I had wanted to put rubber mats on the floor instead of carpet. Rubber mats in a Volkswagen is very “old school.” I ordered some, along with sound insulation for the floor and a carpet kit for the back. The carpet kit is designed to fit a car with the back seat removed, which is how I have it set up. I put the rubber mats in and they looked great. To make the carpet kit for the rear of the car work right, I had to make a wooden floor where the back seat would normally mount. Once I did that, the carpet get went in nicely with just a little glue.

Next project was to get the brakes working on the dune buggy. I replaced the master cylinder, bled the air out of the brake lines and tested the brakes. They worked just fine. Three cars running, again.

Sure, my old VWs are high-maintenance, but I like working on them. It is very satisfying to be driving a car that I built and repaired myself and have it work so well. After all the work I’ve done on all the cars, when something goes wrong, I usually know right away what it is and how to fix it. There is nothing arcane or mysterious about malfunctions of cars you’ve built from the ground up. I know every inch of them, I know when they don’t sound right, or feel right. They’re fun to drive and they’re all different. Plus, you meet some very interesting people when you drive vintage VWs. I often get stopped in parking lots and gas stations by people who want to talk about the Volkswagens they used to own. Most people wish they still had theirs. I’m happy to share stories with them and don’t mind being envied for still having mine.

Thursday, February 9, 2012

The Little Red Car is Alive!!

It Lives


In our last episode, which took place eleven months ago, the Little Red Car’s engine had finally given up and I had ordered a rebuilt 1600cc, dual port to replace it. It took about six weeks to get the rebuilt motor. My friends at Bob Costa Enterprises supplied the core for the rebuild since I didn’t want to use the one I had. The engine block that came with the car when I bought it must have been from a late model fuel injected car since it had no provision for a mechanical fuel pump to be mounted in the block. That was just another one of those little things about this car that has had me shaking my head continually since I bought it. Wherever the engine originally came from, I didn’t want to base a rebuilt engine on that block, so instead we used an earlier block.

In 1965, this car had been equipped with a 1200cc engine, single port intake and a small single barrel carburetor. The electrical system was probably 6 volt; it was powered by a generator. The 1.2 liter engine produced 40 horsepower.

When I got the car, it had a late model engine of unknown size, probably 1600cc. The single barrel carburetor is from the early 70’s. The electrical system was 12 volt and powered by an alternator. The alternator first appeared on Beetles in about 1974. I don’t know what transaxle I got, except that it was worn out and had to be replaced.

The newly rebuilt engine sat in my basement for some weeks until I was ready to remove the seized engine and replace it. It’s a moderately large undertaking to swap out an engine. It’s not all that difficult, but there are many things that have to be done to make it happen. First you’ve got to remove the old engine from the car. That involves disconnecting the accelerator cable, the heater box cables, the fuel line and the four electrical connections (ignition coil, battery, generator idiot light, oil pressure idiot light). I chose to remove most of the stuff attached to the top of the engine as well, which includes the alternator, the alternator tower, the fan shroud, the carburetor and manifold, and the distributor. You don’t have to remove all that stuff, but it’s easier the get the engine out from under the car if you do. Oh, yeah, to get the fan shroud off, you have to remove the engine compartment cover. On most cars you’d all that part the trunk lid, but since the VW engine is in the back of the car, it’s not really a trunk.

Once you’ve got all the stuff removed from the engine it’s relatively easy to remove it. There are four bolts at the front of the engine, two on top and two on the bottom. You loosen up the nuts on those and then thing almost comes out on its own. Actually, to get the engine out you have to raise the rear of the car and support it on jack-stands. Then you put a floor jack under the engine, raise the saddle up under it, pull the engine backwards off of the attaching bolts and the transaxle spline and then gently lower it to the floor. Once you have the engine out, you can remove all the rest of the parts that you will be transferring to the new engine.

The part of this whole process that I enjoy the most is assembling the new engine. What I got back from the rebuilder was the engine block with the cylinders and cylinder heads attached, plus all the important stuff inside like pistons, piston rods, crankshaft, bearings, camshaft, valve lifters, valves and springs – all the stuff that bangs around inside the engine as a result of the burning fuel. To that you have to add the stuff that feeds, ignites, electrifies, and cools. There’s a fan and some sheet metal that directs the cooling air to where it needs to go. There’s the distributor and the ignition wires and the coil that sets the fuel on fire at the proper time. There’s the carburetor and manifold that takes the liquid fuel, mixes it with the proper amount of air and feeds that mixture into the engine. And there’s the alternator that makes electricity to charge the battery, run the radio and produce the spark that burns the fuel that makes the stuff inside bang around which, ideally, provides power to move the car forward.

Putting the thing back together and getting the engine back into the car is fairly straightforward. The hard part is lining up the engine with the transaxle and getting the engine to slide into place. Sometimes it’s easy, sometimes it isn’t. This time is wasn’t, but after much grunting, swearing, resting, giving up, taking a break, trying again, swearing, resting, trying, etc., I finally got the thing put back together. At that point I’d had enough. I left the car where it was, there in the carport, and ignored it for about eight months.

About a month ago, I had some friends help me push it up the driveway to a spot near the back door where I could work on it without driving my neighbor crazy. I set the ignition timing, charged the battery, added some oil and started it up. With a few little tweaks, it ran just fine. It still does.

Since then, I’ve fixed the shifter, adjusted the clutch and drived it around town some. It works just fine. With the Little Red Car back up and running, my only problem is deciding which of my three VWs I want to drive. I’m keeping Carol in the Mitsubishi since it has heat, a/c, automatic transmission and a great stereo. I think she’s had enough adventures in my old VWs to last her a lifetime. I like driving the old VWs, but I think it’s probably an acquired taste. Most people like a few more amenities and a lot more comfort.

Friday, March 25, 2011

The Little Red Car: The Final Conflict

The Little Red Car

It was inevitable, I suppose, but I wasn’t expecting it. I thought I’d repaired everything there was that could go wrong on this car. I replaced the transaxle, the fuel pump, the distributor, the ignition coil, the brake master cylinder, , the accelerator pedal, the shift lever, the emergency brake lever, the heater control cables, the carburetor, the alternator, the tires, the front axle torsion bars, even the radio. What else could possibly go wrong with this car? The only component left, really, was the engine and that seemed to be ticking along just fine. Sure it had always had a strange rattling sound when it was running, but the sound never changed. It was the same sound every time you fired up the engine. It always sounded as if something were loose inside the crankcase, but the sound never got louder or softer. It was always the same . . . until the other day when it wasn’t.

I was out in the back yard messing around in the garden, or working on the Baja Bug, I don’t remember which, when Carol came out to start up the Red Car and head off somewhere. I said goodbye, have a safe trip as she passed. I heard the car door slam and then I heard the starter try and fail to turn the engine over. Okay, I thought, that’s not so good. Carol abandoned the Red Car and took another of our vehicles for her journey. I went on about whatever I was doing – adjusting valves on the Baja Bug, now that I think about it. I was guessing that it was a dead battery that was the cause of the Red Car’s failure to start, so, later that day, I ran an extension cord out the back door and hooked up the battery charger to the Red Car’s battery. I left it to charge overnight and figured I’d do the diagnosis the next morning.

The next day I went out to check on the status of the battery. It appeared to be all charged up, so I unhooked the charger, put it away, then rolled up the extension cord and hung it back up in the basement. I moved the Baja Bug out of its spot behind the basement door so I could put the Red Car there for testing, and then went over to the Red Car, adjusted the seat so that I could get behind the wheel, climbed in and put the key in the ignition. When I turned the key, I heard the very same sound that I had heard the day before. The starter engaged the flywheel and then failed to turn the engine. Well, then, that would seem to be Symptom Number 1 in the diagnosis. I released the parking brake but left the car in gear and then climbed back out and tried to rock the car a bit to break things loose. It wouldn’t rock and it certainly wouldn’t roll. Here we had Symptom Number 2 in the diagnosis. I was now suspecting that the engine has seized. I went back into the basement to get a big adjustable wrench to try to turn the engine over by hand. I was able to move the engine backwards and then forward a bit. I set the wrench aside, climbed back into the car and this time was able to get it started. It seemed to be running just fine and that rattling noise was still there and unchanged. I backed the car up into the space behind the basement door, set the brake, and climbed out, leaving the engine running. One thing I noticed immediately was that the belt that drives the alternator and the fan was shaking quite violently. Other than that, and the ever-present rattle, there was no obvious indication of any other problem. I shut off the engine.

What would cause that belt to shake like that? Well, perhaps one of the pulleys was wobbling a bit. No, that didn’t seem to be the case. I took off the drive belt so I could see if there was some sort of wobble in the crankshaft pulley. As I pulled and pushed on that pulley on the end of the crankshaft I could feel and hear the crankshaft moving back and forth inside the case. Diagnosis: crankshaft bearings are worn out causing excessive heat which, in turn, caused the engine to seize.

Decision time. I had gotten the thing started and it seemed to be running just fine. Do I send Carol off driving around, knowing that at some point the engine will again seize, leaving her stranded somewhere. Do I take the chance of a catastrophic failure of the engine thereby ruining the engine case and whatever else might be in the way when parts start flying around? The answers seem rather self-evident to me. I should leave the car right where it is and order a new engine. That seemed to be the most optimum thing to do at that point, so that’s what I did. It’s in the perfect spot for me to work on right now. It’s not in the way of any other projects. So, the poor dead thing can just sit there and wait until the rebuilt engine is done and I have time to make the swap.

It does leave us to wonder, Carol and I, if this car is worth all the trouble it has caused us. Just when we think we’ve replaced everything that can break, something like this happens. Once the engine has been replaced, though, there really isn’t any part of the running gear that hasn’t been brought up to standards. Still, cars have moving parts which wear out, and this is a 1965 VW we’re talking about, so inevitably sometime in the future something else will fail on this car. I have to maintain a rather philosophical attitude about this car; otherwise I’d be tempted to have the thing hauled off to the junk yard and crushed in order to keep anyone else from having to go through what we’ve gone through with it.

Saturday, February 26, 2011

Return of the Little Red Car

Alternator

You may remember from our last episode that the Little Red Car had shorted out its electrical system on the freeway and had nearly gotten us all killed. Little did we know that this problem created another, secret, hidden problem that didn’t show up until several weeks had passed. Like high blood pressure, this problem lurked in the background, slowly doing its damage until it reached the point of no return.

Carol was behind the wheel, of course, when the Little Red Car once again stopped working. I don’t remember what I was doing when my cell phone rang, but whatever it was, it didn’t have anything to do with planning a stranded car rescue. My phone is programmed with a special ring that only plays when Carol calls. Since she was calling shortly after she had left the house, I suspected that she was having car trouble. I had her describe the symptoms of the problem to me. From the information she gave me, it sounded like another electrical problem. The lights on the dashboard were working, but the engine had quit running when she stopped at a corner and now the starter would not turn over the engine. The way she described it made it sound as if the battery had gone dead. That seemed strange to me since there had been no evidence of any problem with the charging system on the car. There are no gauges on the car for the electrical system, though, just a light that goes on when the alternator is not generating any power. She hadn’t mentioned any warning lights coming on recently.

Armed with enough information to make a selection of the tools I would likely need, I went down to the workshop and loaded up a tray with my multi-meter, a test light, some electrical tape, a couple of wrenches, a screwdriver, some wire cutters, a pair of Channel-Lock pliers and a pair of Vice Grips. If I couldn’t fix it with that, it would probably have to be towed. Since a battery problem seemed likely, I decided to drive my Baja Bug on the rescue mission. I figured that, if all else failed, I could take the battery out of the Baja Bug and put it in the Little Red Car to get Carol started and back on her way.

When I got to where Carol had stopped, and after saying “hello,” I had her get behind the wheel and try to start the car. It was obvious then, from the way the starter motor reacted, that the battery was dead. I opened up the passenger-side door and, leaning over the front seat, pulled up the bottom of the rear seat to expose the battery. The terminals didn’t look particularly corroded, so I pried off the caps to see if it was low on fluid. It wasn’t just low on fluid, it was nearly dry. It was no wonder that the car wouldn’t start. I removed the battery and set it on the sidewalk alongside the car. I then went to the Baja Bug, removed its battery and installed it into the Little Red Car. The Little Red Car now started and ran just fine. I took the nearly dry battery and installed it into the Baja Bug. It would not start the car, but there seemed to be enough power remaining to run the car, if I could get it started. I left the Little Red Car running, removed its battery and carried it over to the Baja Bug. By placing the two batteries face to face in the Baja Bug and jumping across the terminals from the good battery to the bad one, I was able to get the Baja Bug running. I then left it running, took the good battery back to the Little Red Car and re-installed it.

I sent Carol on her way and I drove the Baja Bug home. Once there, I filled the dry battery up with water. It took quite a lot to fill it up. I then hooked it up to the battery charger and left it to charge while I went back to whatever I had been doing before I was called out for the rescue mission. As I puttered around the house during the day, I thought about all the things that could have caused that battery to go dry that way. The most obvious cause was overcharging. Overcharging will cause the battery fluid to boil off, which seemed to be what had happened. The only way to be certain, though, was to put a volt meter on the alternator of the Little Red Car, and that would have to wait until Carol came home.

I had Carol park the Little Red Car behind the workshop when she got home. I got out my multi-meter, plugged in the leads and set the range for 0-15 volts. Then, I lifted the hood of the car, started up the engine and put the leads from the tester on the appropriate terminals of the alternator. The needle on the tester hit the peg on the right side of the meter and stayed there. I changed the range so that I could see how much voltage the alternator was actually producing. It read over 25 volts, over twice the voltage of the battery. No wonder the battery had boiled dry. At that point, I knew what had happened. When the electrical system had shorted out several weeks before, the short had destroyed the internal voltage regulator on the alternator. Once that happened, the alternator had no regulator at all and was just pouring every volt it could produce right into the battery the entire time the engine was running. The result: a dry battery and a car that won’t start.

Knowing what was wrong, it was a simple matter of replacing the alternator and the car was again running perfectly. I left the new battery in the Little Red Car and kept the boiled one in the Baja Bug, hoping that it hadn’t been ruined. The other day, I discovered that the boiled battery was no longer staying charged, so the next project is replacing the battery in the Baja Bug. At least that will be easy, since I already know what the problem is.

Tuesday, November 9, 2010

A Work in Progress, Chapter 7

Pump

In my enthusiasm to get the project moving ahead, during the early part of the Baja Bug project, I had cut off too much of the front end sheet metal and had to weld a one-foot section back on in order to have a way to secure the gas tank. When I bought the gas tank from my parts people, there were a variety of tanks available which all looked very similar. We selected one that looked like it would fit and I loaded it up, took it home and stored it in the basement until I was ready to install it. The one thing I didn’t know about that particular gas tank was that instead of having the normal ten gallon capacity, this one held only eight gallons. When I was installing it, the capacity didn’t really matter. Later, it would become somewhat of a problem until I realized what I was dealing with.

One of the disasters I tried to avoid with the Baja Bug project was the Fuel Line Disaster that happened during the Dune Buggy project. The Dune Buggy was built on a 1957 pan, whereas the Baja Bug is a 1967 car. When I hooked up the fuel lines on either end of the steel line that passes through the length of the pan on the Dune Buggy, I had no indication as to the condition of that steel fuel line, since it is hidden inside the center spine of the pan for much of its length. The first time I had any clue as to its condition was when I poured a couple of gallons of gasoline into the tank when I was ready to try to start up the engine. All the fuel I poured into the tank ran out of all the little holes in the steel fuel line inside the spine, eventually running out at each end of the car all over the garage floor. It was a mess and a potentially very dangerous mess, as well. I cleaned up as best as I could and waited a few days for all the fuel to dry up before I fixed the problem. After some evaluation of the situation, I decided to run a whole new metal fuel line through the inside of the car rather than try to replace the hidden line. I used malleable copper for the new fuel line and it has proven to be quite a good solution to the problem.

Given my previous experience with VW fuel lines, I was very careful when I hooked up the Baja Bug lines. To avoid another major fuel spill, I added a very small amount of gasoline to the tank until I was sure all my fuel lines were intact. It turned out that the steel line in the Baja Bug was in good condition, so the installation went very well. I hooked up all fuel lines, dropped in the tank, and tested the system. Everything seemed to be working. Of course, as with all my VW projects “seemed to be” was the key phrase for this one, too. The other component of the fuel system, the fuel pump, also wound up being a problem. The cause was another one of those little tiny, seemingly insignificant, details that I had never encountered before. I leaned that the relationship between the fuel pump, its spacer and the pump rod are very critical.

Once I had everything hooked up, it was time for a test drive. After a bit of cranking to get fuel from the tank to the engine via the fuel pump, the engine started up. With a minimum of adjustment, I got the carburetors balanced and the engine idling and drove the car around the block to make sure there were no steering, braking, or shifting problems. All systems seemed to be operating perfectly. They weren’t, but, for the moment, everything appeared to be working properly. I drove the car around the block a couple of times to be sure it was going to continue to work and, again, all systems were working. I pulled it back into the driveway and parked it. Then, I looked it over thoroughly to see if there were any obvious leaks or other problems. It looked good. So good, in fact, that I felt confident enough to take it for a ride on the freeway. It ran really well with good acceleration, adequate braking performance and predictable handling characteristics. As I was cruising south on the freeway, just a couple of miles from home, the engine sputtered and died as if it were out of gas. I coasted off onto the shoulder of the road, got out of the car and started checking out the fuel system. It appeared that the rubber line under the fuel tank had gotten kinked, shutting off the fuel flow. I straightened out the line and tried to restart the engine. I cranked the engine until the battery was too low to turn the starter any more. I had no choice at that point but to call roadside assistance and have it towed off of the freeway. They dropped the car and I on the street just a mile or so from my house. I locked the car doors and walked back to my house where I got my truck and a tow bar and went back and picked up the car.

Once I had the car back in my driveway, I began a careful diagnosis of the problem. There was adequate fuel in the tank. The fuel lines were clear back to the engine, but the fuel pump wasn’t pumping any fuel. I figured it was a defective pump, but, when I removed it, I found that it was actually a broken fuel pump. This is when I leaned about the relationship between the fuel pump, its spacer and the pump rod. If the spacer is too short, the rod pushes up too far and breaks the actuating lever inside the fuel pump. I had another fuel pump on hand and a different spacer. Once I installed the correct spacer, the fuel pump worked perfectly, and I was back on the road.

As I drove the car around town, I kept track of the fuel I was using so I could get an idea of the gas mileage I was getting. This was important because I hadn’t yet installed a fuel gauge on the vehicle. Once I knew how many miles per gallon I was getting, I could figure out how often I needed to fill the gas tank. Not yet knowing that the fuel tank held only eight gallons, all my calculations were based on a tank holding ten. I usually fill up the gas tanks on my VWs every one hundred miles, so having a tank that held only eight gallons didn’t become evident until I got lazy one day and made a trip under the assumption that I had plenty of gas left in my tank to make it to the gas station. That would have been true if the tank had held ten gallons. Since it didn’t, I ran out of gas on the freeway. Being as it was the weekend when this occurred, the freeway rescue trucks weren’t running, so I had to call my wife. She was at my brother-in-law’s house and she sent him to rescue me. He brought me a gallon can which I emptied into the tank. When I got to the gas station, it took seven and a half gallons of gas to fill that tank. That was when I discovered the real capacity of that tank. I haven’t run out of gas in that car since.

The gas tank in the Baja Bug is the only eight gallon VW gas tank that anyone has ever heard of. I’ve never bothered to replace it with a ten gallon tank. I just know that I can’t get lazy and go much beyond one hundred miles before I fill up the tank. I will leave you with this bit of advice, though: If you are going to run your VW without a fuel gauge, be sure to check the capacity of the fuel tank before taking any long trips, or carry a gallon can of fuel in the trunk, just in case.